Do not miss out on the benefits and fun of Pinterest!
Pinterest is one of the online platforms you can primarily enjoy visual content. It gives you a space to browse occasions, themes, products, recipes, styles, ideas, etc., and find visuals about them.
Pinterest defines itself not precisely as a social media platform.
Pinterest is a visual discovery engine...
But you can also share things on Pinterest.
Terminology of Pinterest
Pinterest has specific terms. Looking at these words might help understand how to use features on Pinterest.
Pin: It is image content on Pinterest connected to a website. Pins contain an image, a link, a title, and a description.
Board: It is where Pinterest users can collect pins in. Boards are created chiefly to bring pins that have the same theme together.
Pinner: It is the name for a Pinterest user.
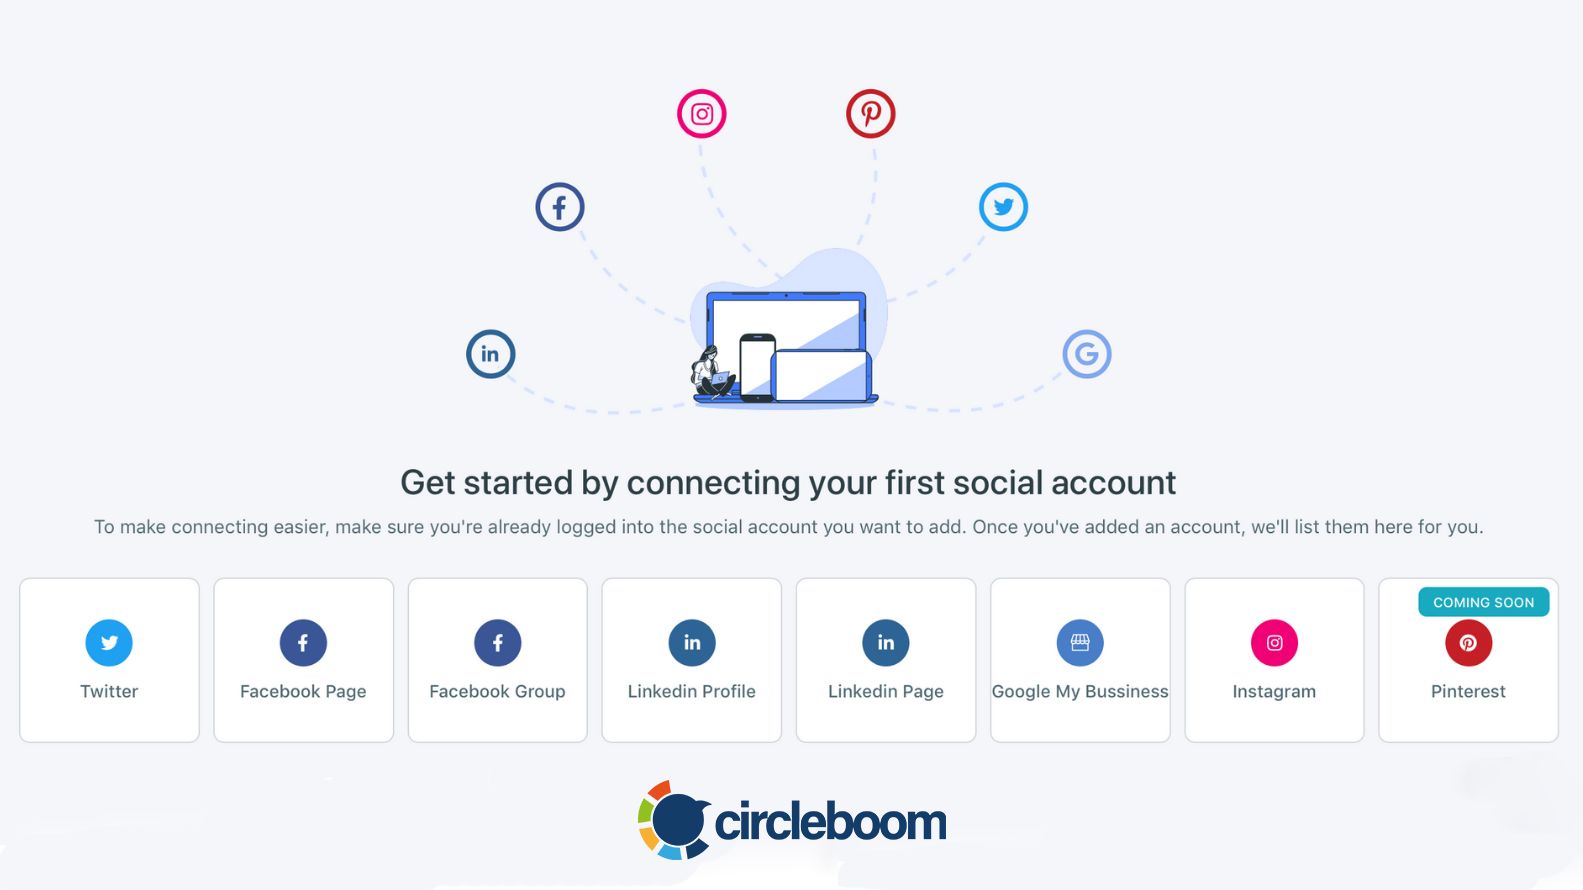
In this article, we present multiple ways to create pins and schedule them. Before starting, we want to highlight the easiest way to make the shortcut! You can manage all your Pinterest boards and even multiple Pinterest accounts through a single board without shifting between multiple boards and profiles!
How to create a pin on Pinterest?
You can imagine the pins on Pinterest as posts in the form of visual content. These visual posts show up there to be searched and collected by the people.
Your posts do not vanish after a while, like on Instagram, Facebook, or Twitter. In other words, the pins remain public and can be easily accessed by the followers of a pinner and by those interested in the topic.
Here, you can follow the steps explained to create pins on Pinterest.
Therefore, what Pinterest provides to the pinners is enormous availability for circulation of content and their original sources. Businesses and bloggers can draw significant benefits from the use of Pinterest in the sense that it is a fruitful place to gain organic traffic to your site.
How to post pictures on Pinterest from a computer, phone, or tablet?
You can select the image you want to make a pin in many ways, such as by using a desktop, mobile device, browser with a browser button, browser with a URL, or using a business account.
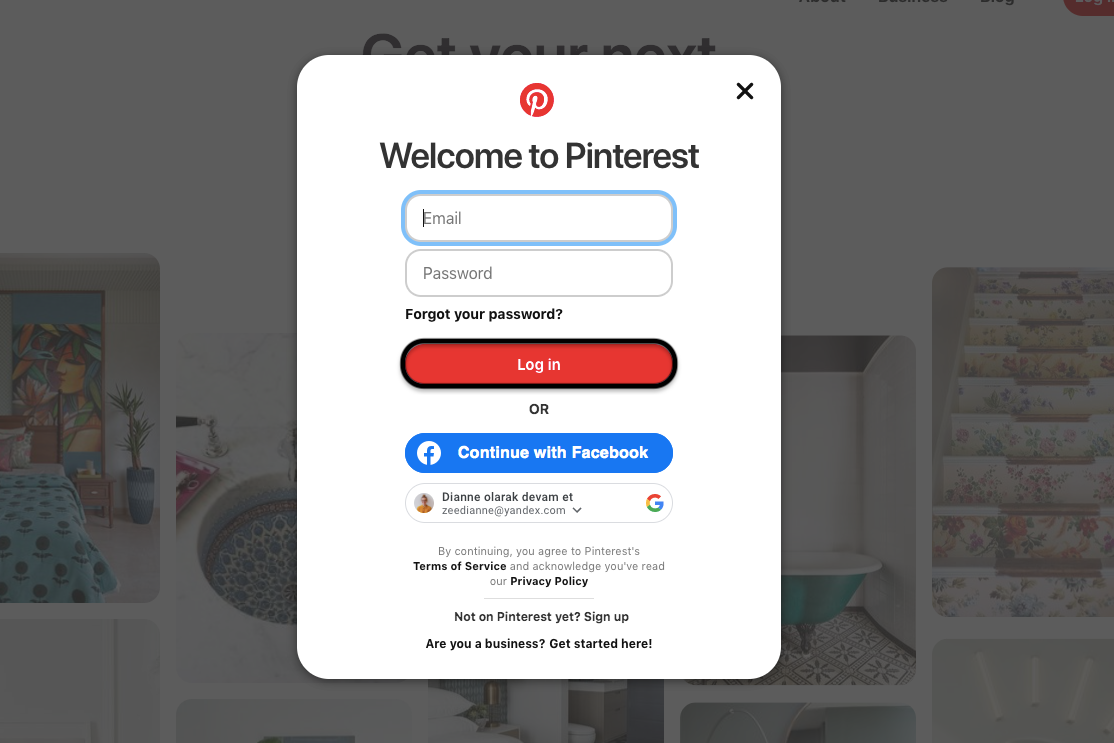
Step #1: Go to the website of Pinterest and log into your account.
You can enter your email and password or continue with other platforms to log in to Pinterest.
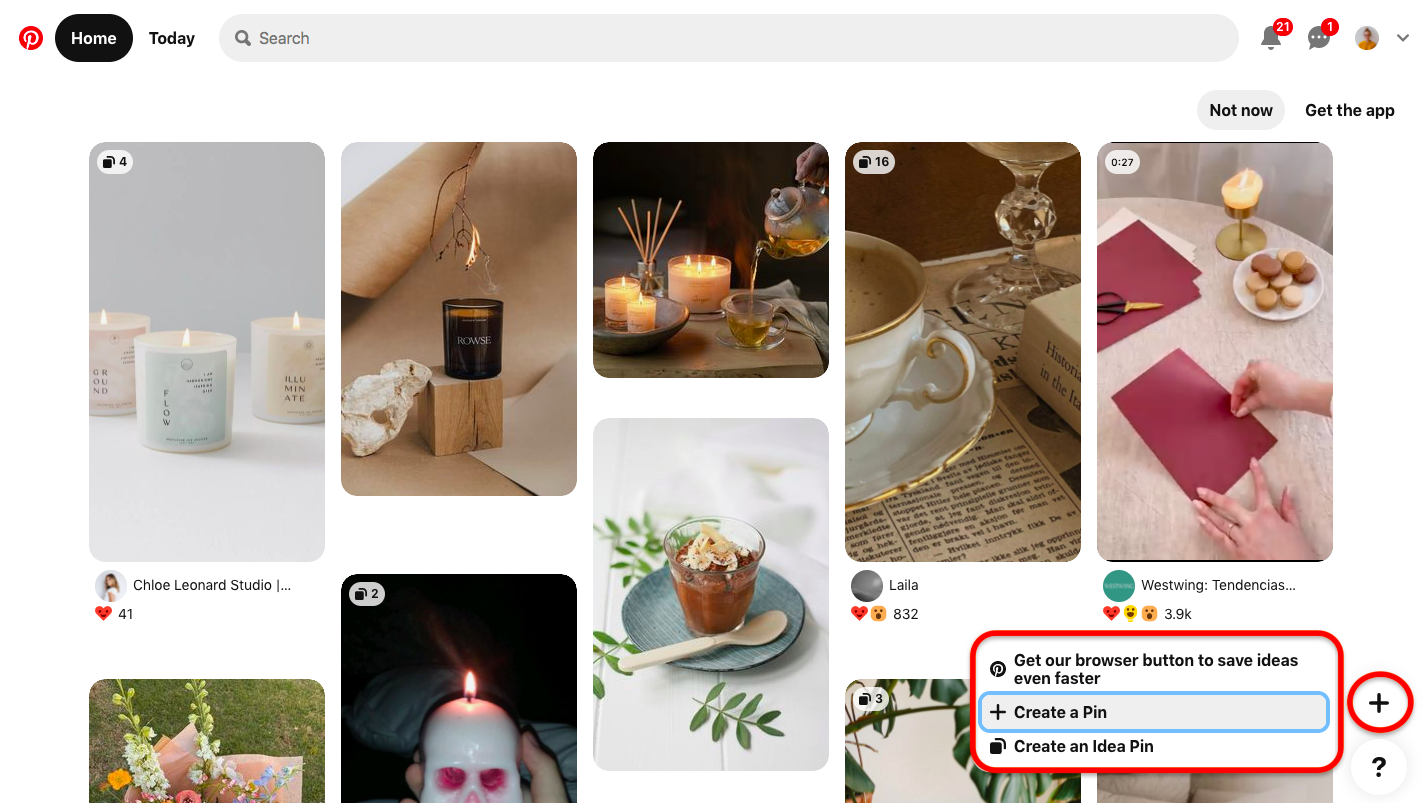
Step #2: Find the ( + ) symbol on the homepage and click on it.
After you click the plus ( + ) symbol, a little box will appear from where you can navigate pin creation. Click on the "+ Create a Pin".
Step #3: Now, you can prepare your pin by filling in the blank sections.
You can upload the image you want to put on your pin. Drag and drop or click to upload an image. Your image is suggested to be a high-quality JPG file that is not more than 20 MB.
You need to enter a title and a destination link. Also, you can write a description of your pin to let the audience be informed.
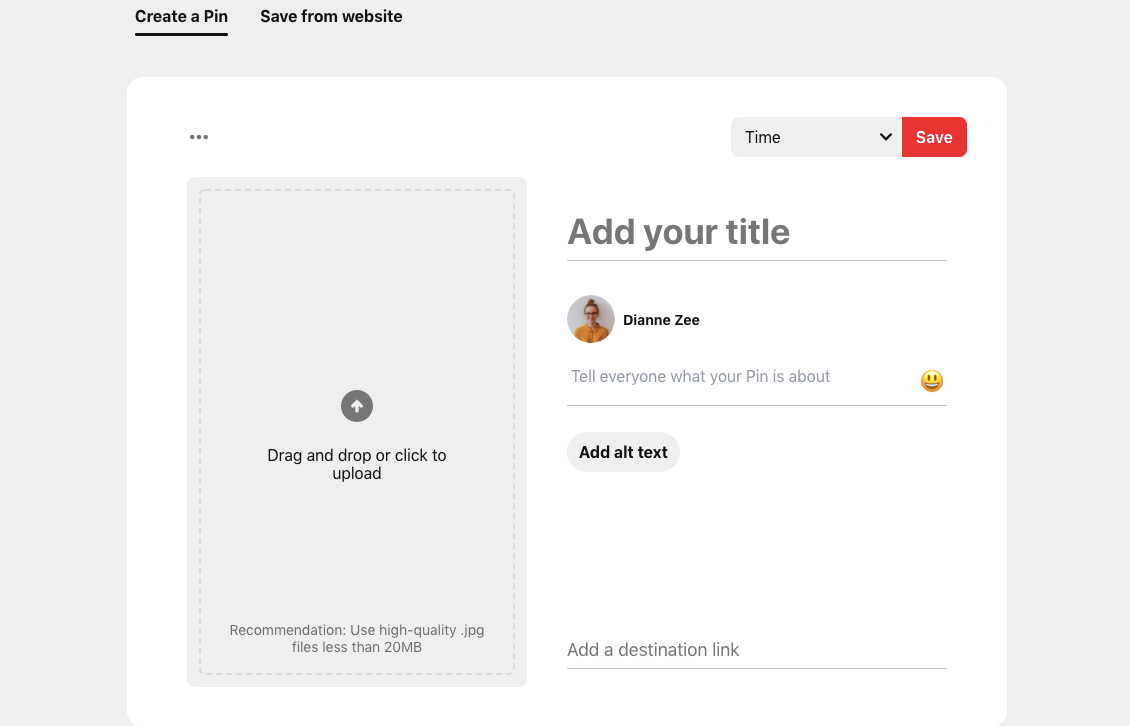
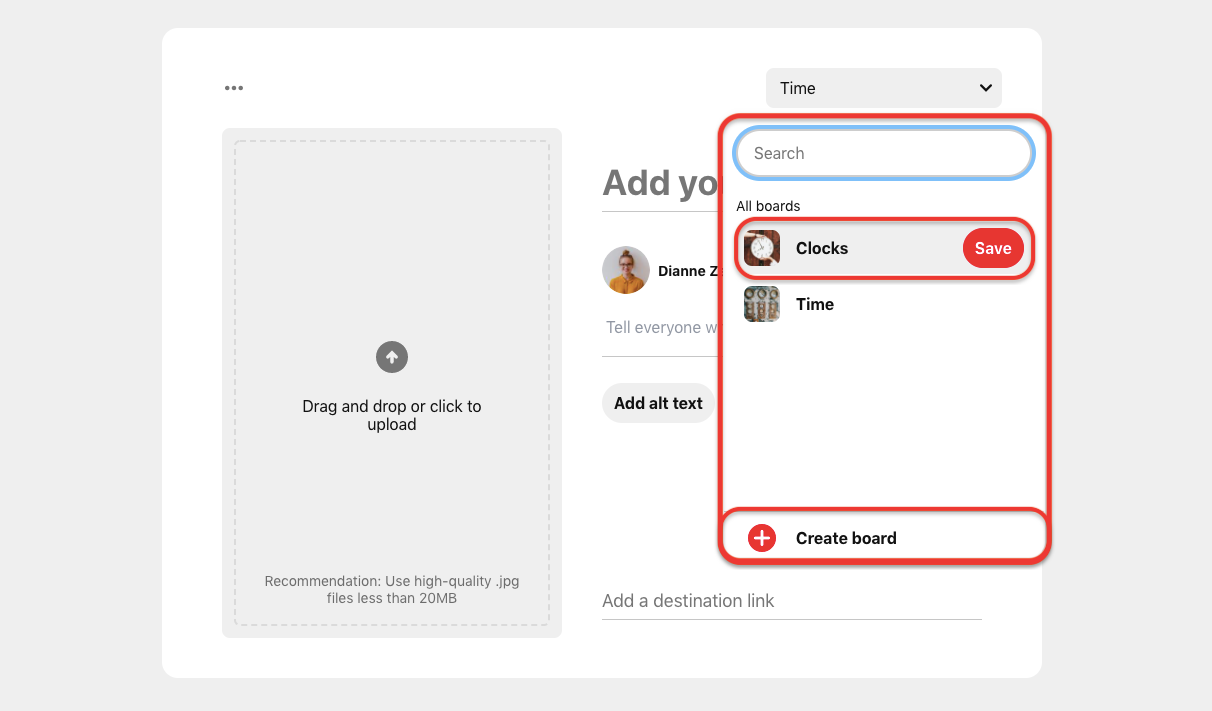
Step #4: Choose a board on which you want to put your pin. You can find it in the top-right corner of the create a pin section.
If you want to create a new one, click on the "create board". After choosing a board or creating a new one, click on the "save".
If you want to create a pin from the browser rather than a computer, you need to follow other steps.
There are two ways to create a pin from your browser. One is by using a browser button, and the other is without a browser button.
How to post Pinterest Pins in bulk?
Are you in charge of many Pinterest accounts? Or do you have a heavy workload that prevents you from checking your Pinterest account on a regular basis? You can add your pins to content queues that you create and have them auto-post on Pinterest at specified intervals for specific dates or schedule them to post on Pinterest.
Circleboom Publish can help you schedule or publish pins on Pinterest in a large amount.
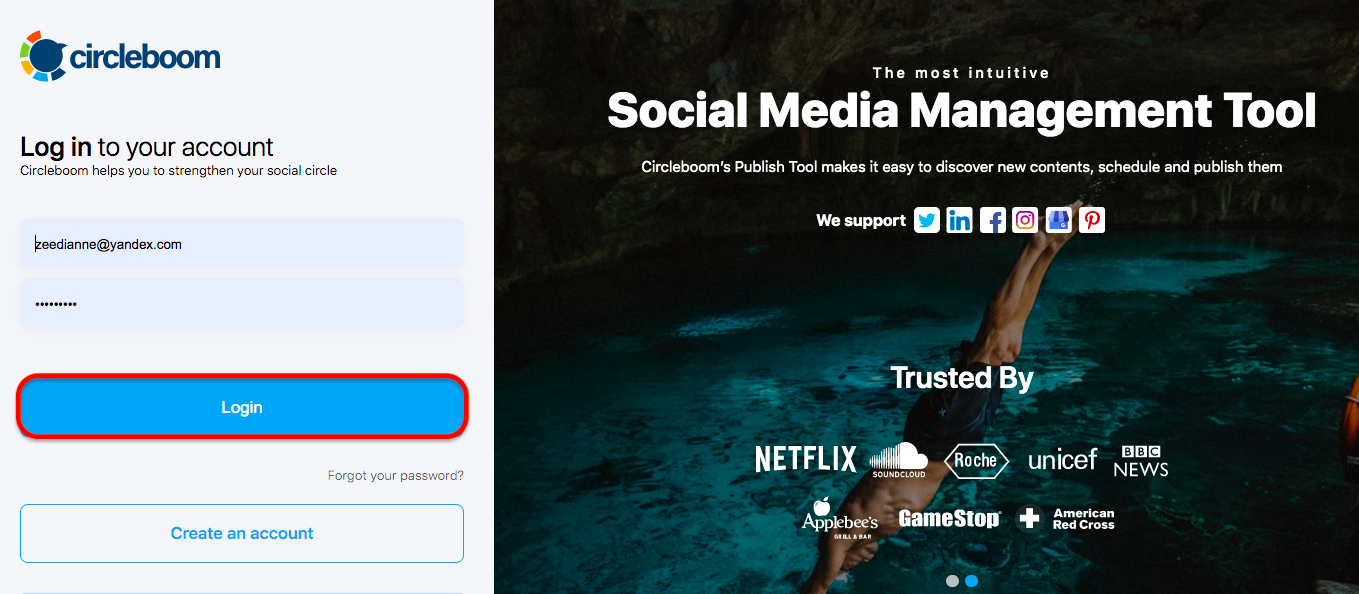
Step #1: Log in to Circleboom Publish.
Enter your email address and password. Then, you can link your Pinterest account(s).
Step #2: Find and click on the "create new post" part in the sidebar on the left-hand side of the dashboard.
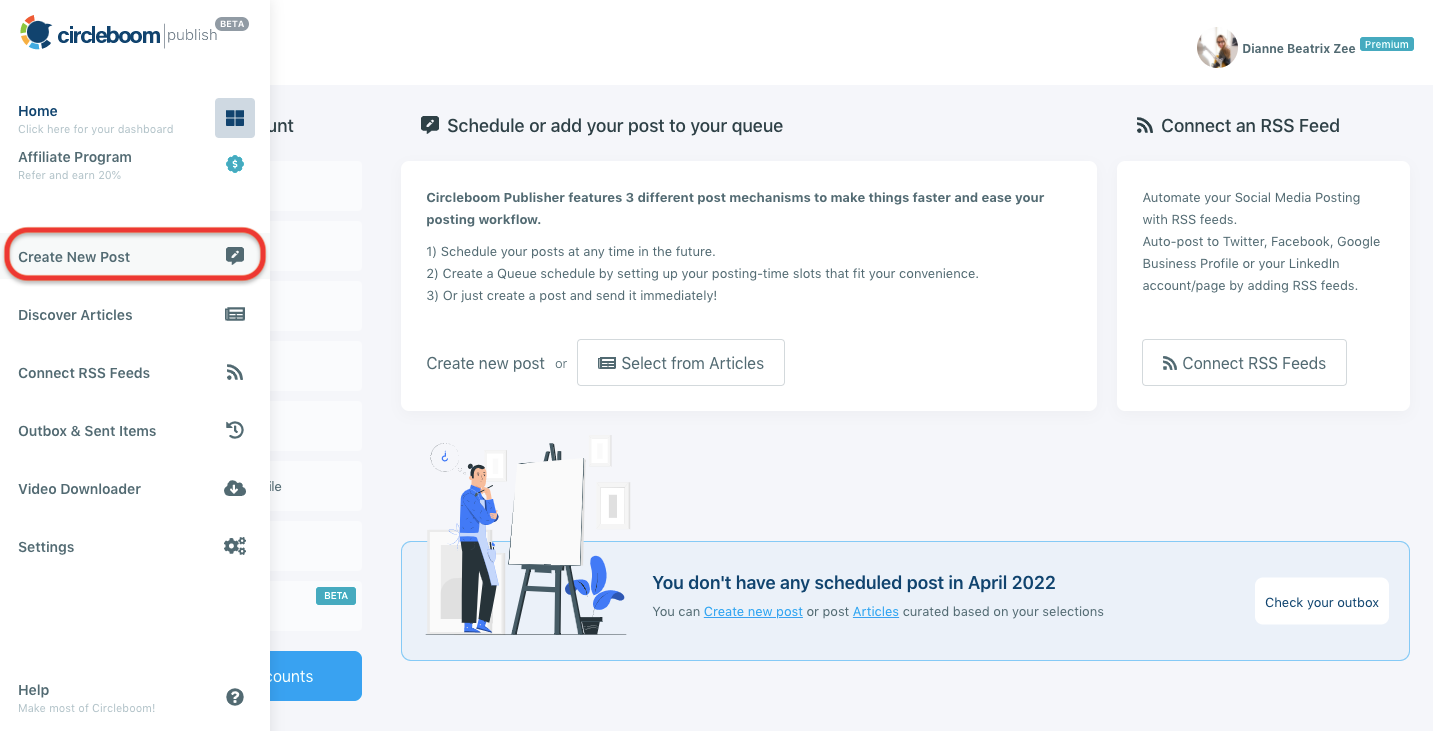
Step #3: Select your Pinterest accounts.
Circleboom Publish makes it possible to link and manage multiple Pinterest accounts and create content for them simultaneously. You can choose multiple boards or accounts here.

Pro Tip: Also, you can prepare your posts by utilizing the built-in feature of Circleboom Publish, which is the design tool for the production of creative content.
Pin design tools like Canva are built-in to Circleboom Publish, as other content curation add-ons like Unsplash and Giphy.
You can design your pins for several Pinterest boards leveraging these handy tools. By utilizing Canva ready-made, useful Pinterest pin templates on the same board to create images to be published as pins.

You don't have to worry about Circleboom's pin size requirements while doing so. Simply choose a pin design template and let folks talk about your eye-catching content!

Step #4: Once you are done with the design, there are options for sharing your content.
You can choose between "Add to my Queue", "Schedule it", and "Post".

You can watch the video instruction on using Circleboom Publish's tool, Pinterest Bulk Pinner, for Pinterest:
How to quickly create and post on Pinterest via a browser button?
You can install a Pinterest browser button on Chrome, Firefox, and Microsoft Edge to be able to add images quickly as pins on your board on Pinterest.
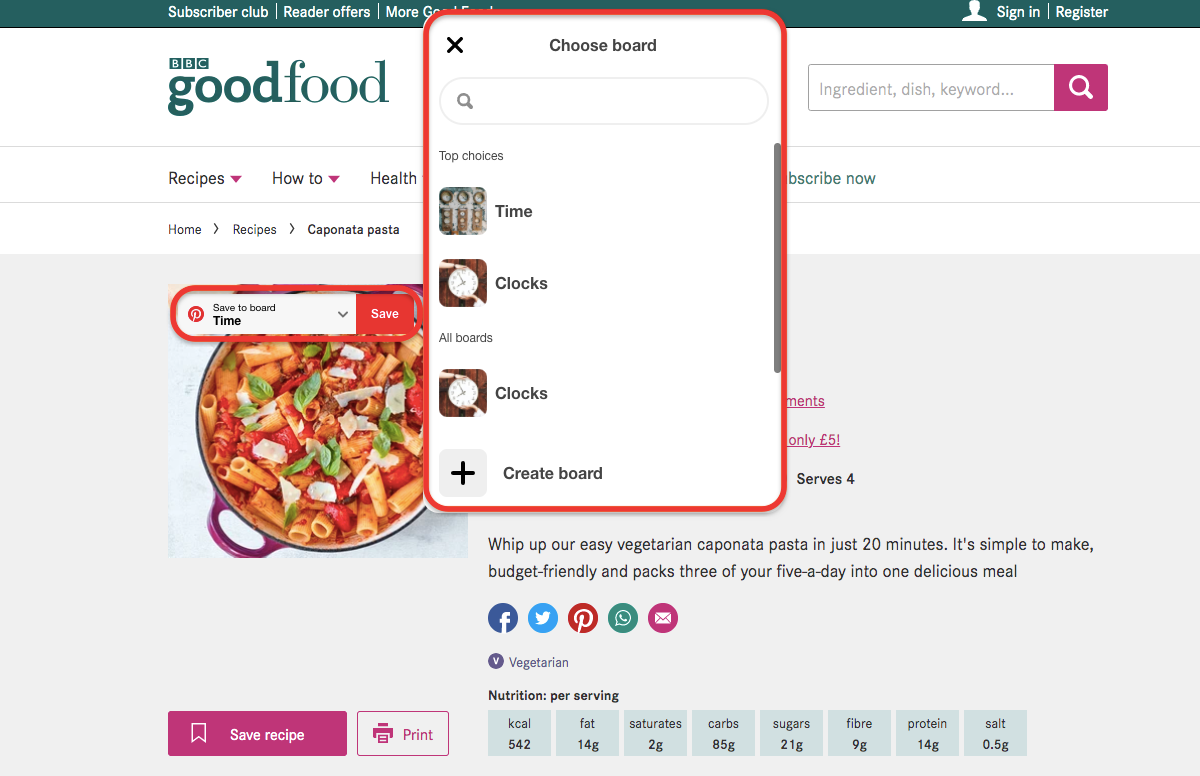
For instance, you can easily install Pinterest save button as an extension on Chrome. Then, you can save the content properly as pins on your Pinterest board wherever you find it.
Here, there is a recipe article on BBC Good Food. You can save it by finding the Pinterest symbol at the top of the image and clicking on the "save" button.
How to create posts on Pinterest via a website URL
The other option to generate a pin on your Pinterest board from the sources on the Internet is to use a website URL. Instead of using an extension for your browser, you can use the link of the source.
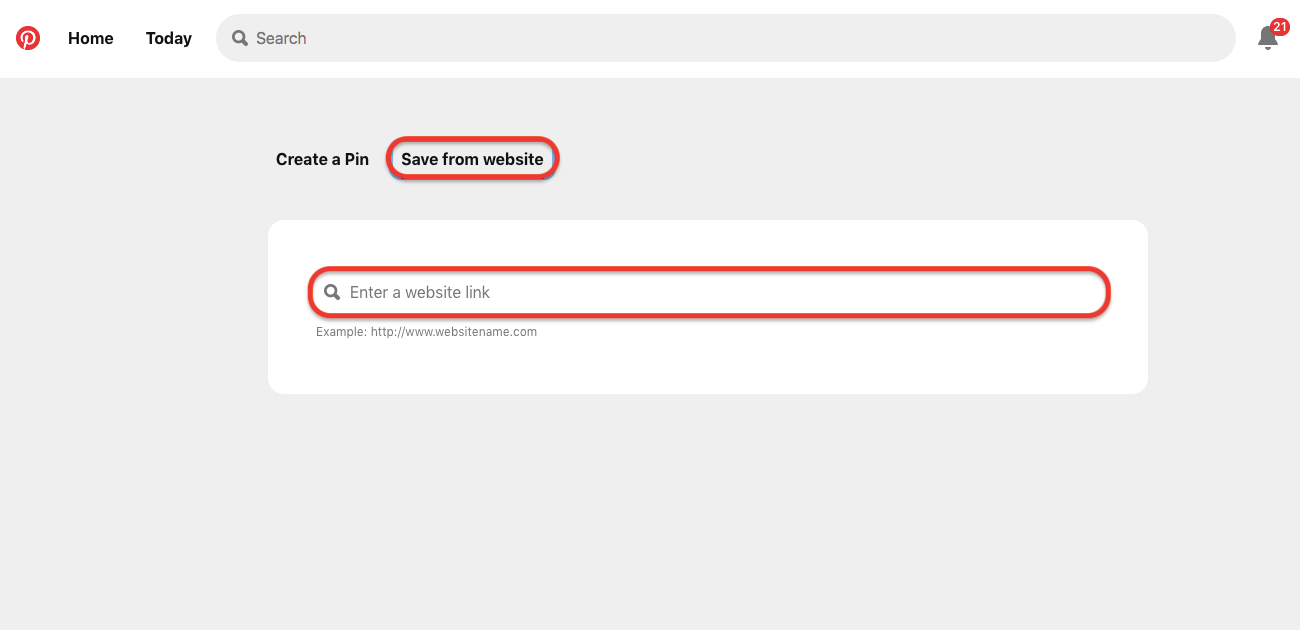
You can follow similar steps for creating a pin from a computer or mobile device until the third one. After finding the plus symbol ( + ) and clicking on the "+ create a pin", you can follow the steps below.
Step #3: Click on the "save from website".
You need to add a source link to create a pin.
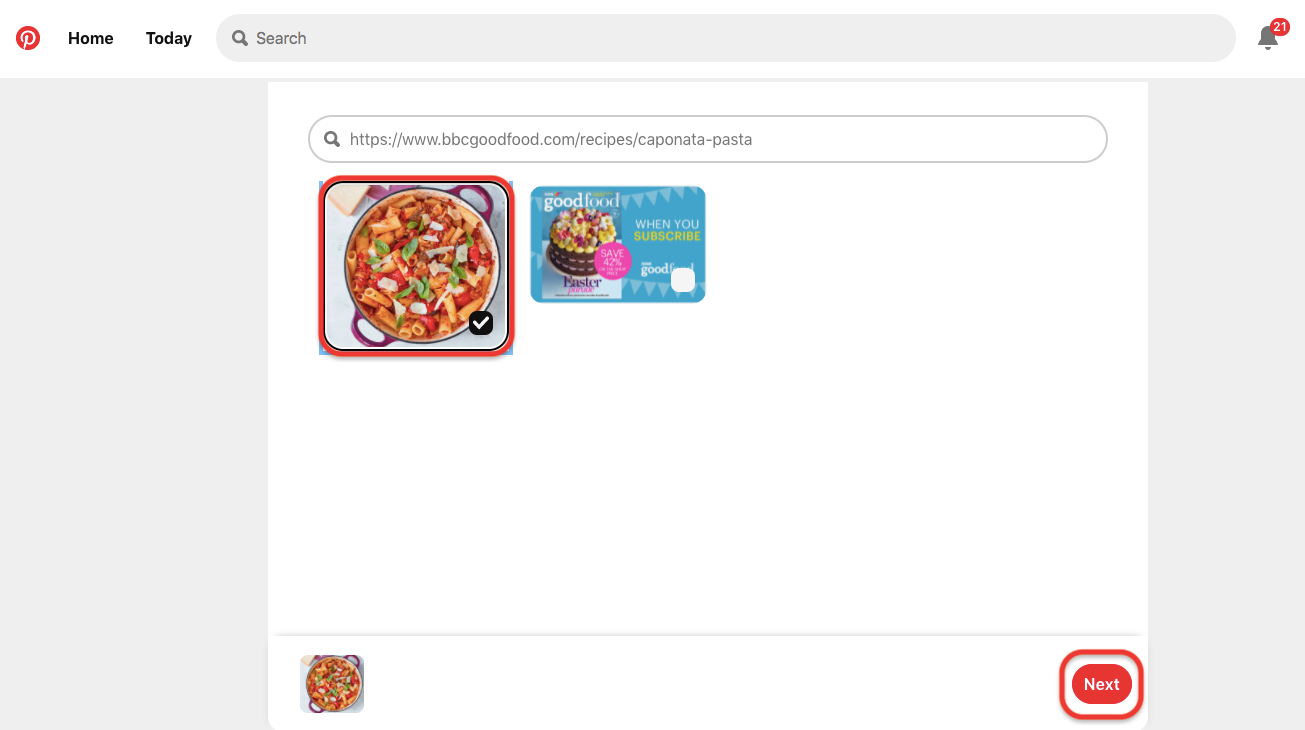
Step #4: After entering the source's link, you can select the image.
Click on the "next".
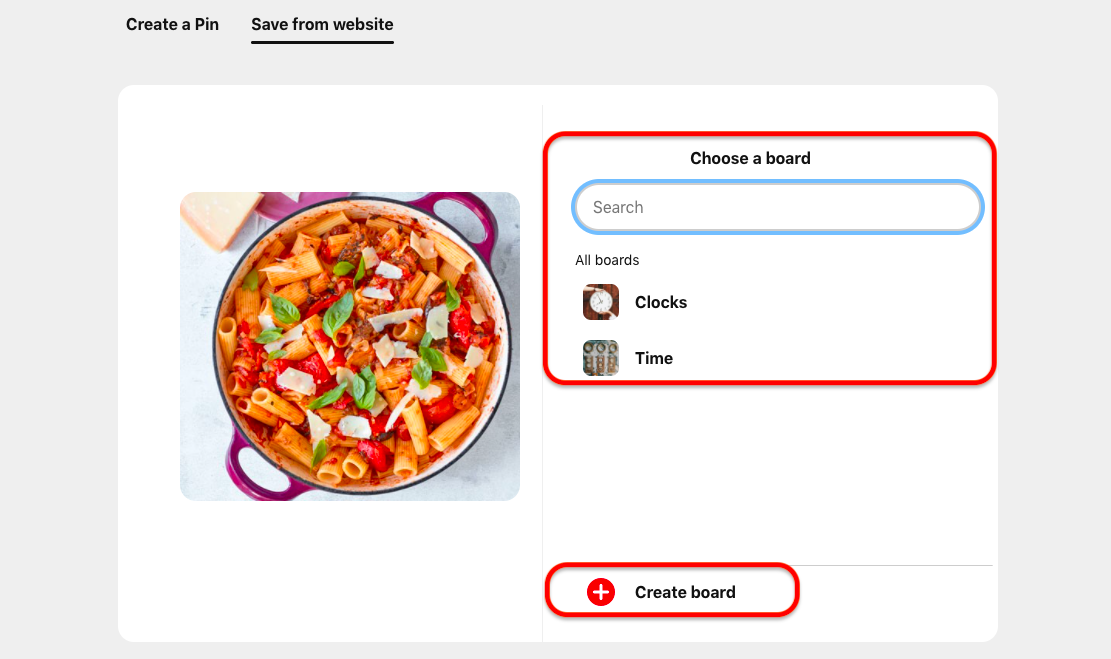
Step #5: You will navigate the board selection. Choose a board to put your pin on it.
If you have not generated a board related to the topic of a pin you want to save, you can create a new one by clicking on the "+ create board".
When you decide which board you want to deliver the pin to, you can click on the "save".
To write a caption as an alternative text for your pins would make your pins more reachable to other people. You can give more details and an explanation. Remember! Adding an alternative text is only possible without using the Pinterest browser button.
How to create posts on Pinterest via a business account
Another way of creating Pins on Pinterest is by using a business account. The pins generated by a business account will direct the audience to your business' website, where your products, ideas, and services are showcased.
To create a pin with a business account, first of all, you need to have a Pinterest business account.
How to create a Pinterest business account
You can transform your personal account into a professional one, create a new one for business, or a linked business account. To get a new business account, you can follow the steps below.
#1 Having a new one
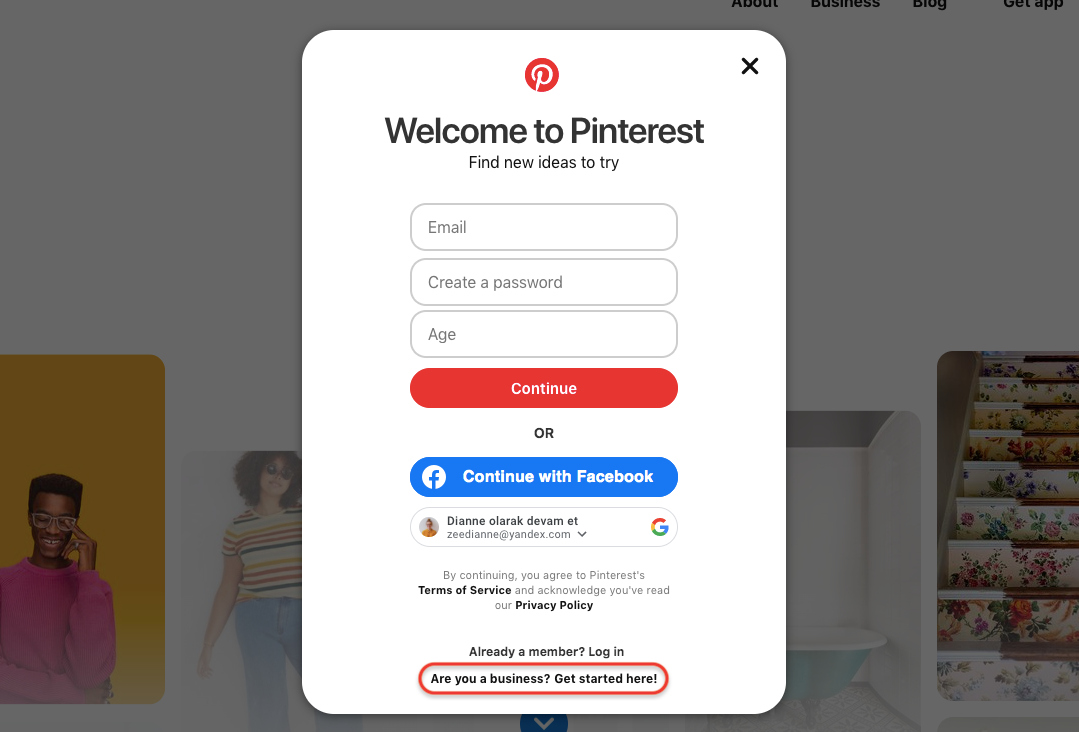
Step #1: Go to the website of Pinterest. Click on "sign up" at the top of the page.
Then, click on the part marked.
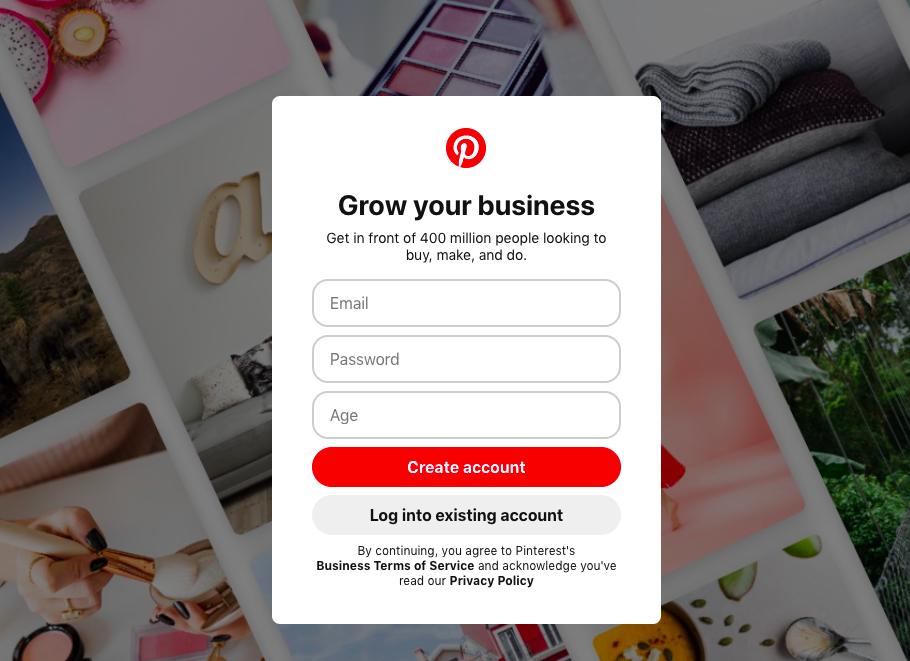
Step #2: Enter the information to create a new business account.
Read Pinterest's Business Terms of Services and Privacy Policy, and if you agree with them, click on the "create account".
#2 Having a linked one
To connect a business account to your already existing personal account, you can take action as explained below.
Step #1: Log in to your personal Pinterest account.
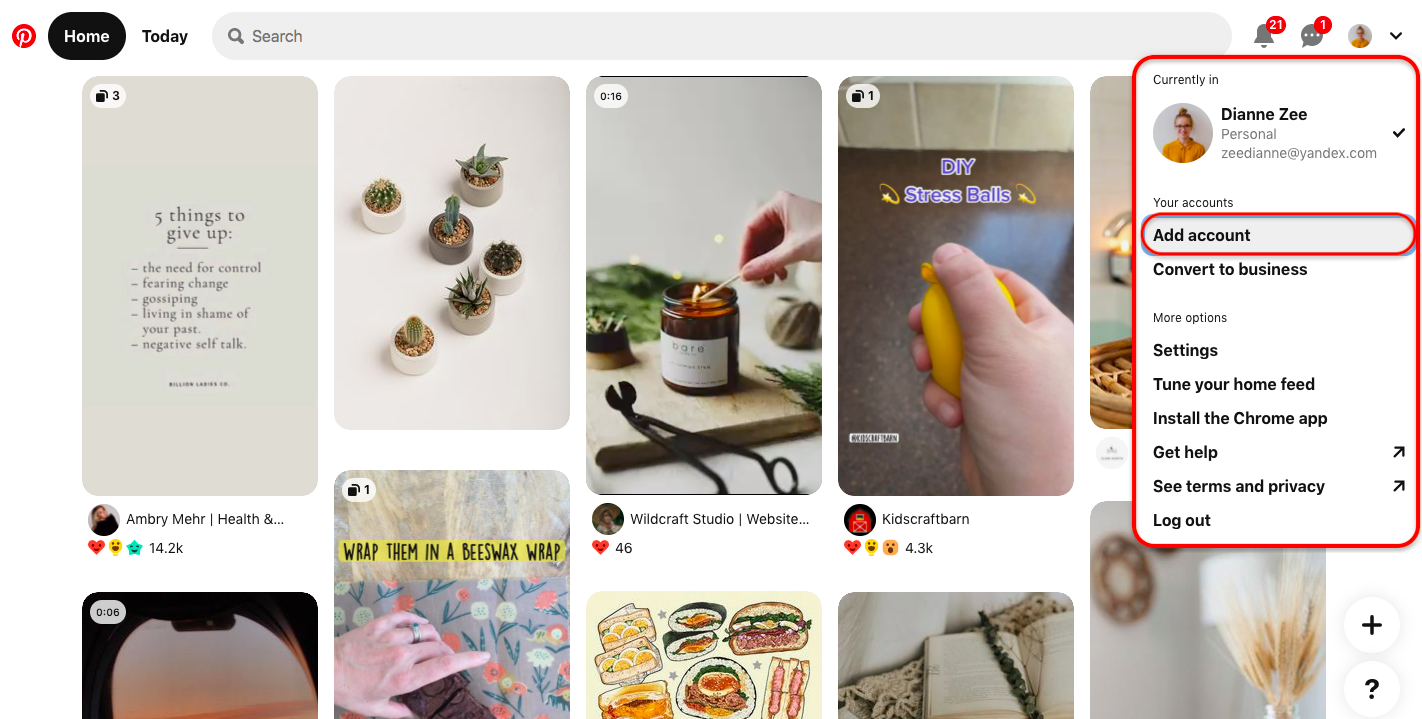
Step #2: Find and click on the down arrow symbol at the top-right of the page.
Then, click on the "Add account" part.
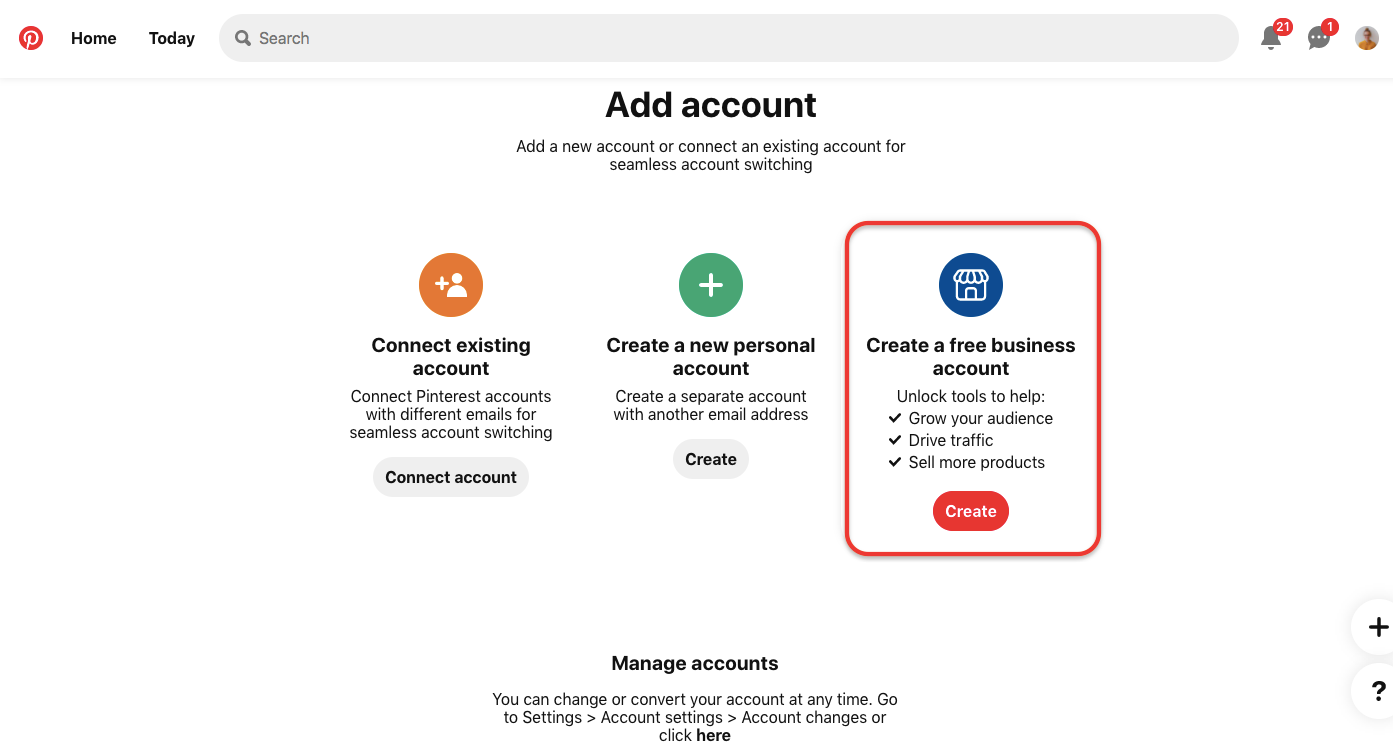
Step #3: You can click on the "Create" button under the create a free business account.
There is a summary of the benefits of creating a free business account, such as growing your audience, driving traffic, and selling more products.
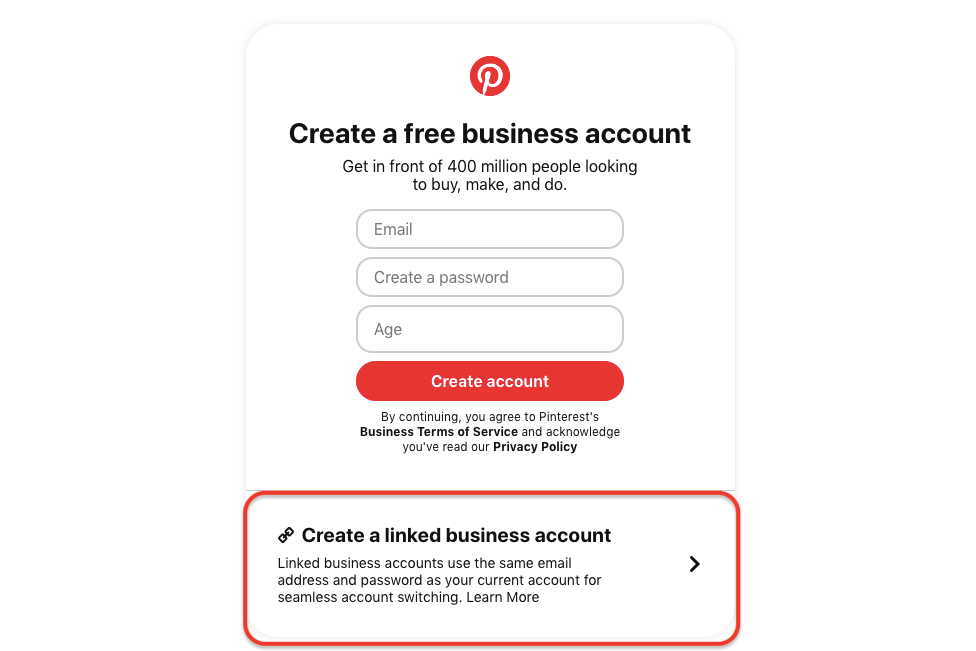
Step #4: You need to click on the "create a linked business account" as marked.
After navigating the next page, you can click on "create linked account".
#3 Having a converted one
The other way to possess a business account is to switch from personal. Your followers and pins will not be lost. Also, there is an opportunity to turn back to a personal account from the business one.
To transform the status of an existed Pinterest account into a business one, you can follow the steps below.
Step #1: Log in to your personal Pinterest account.
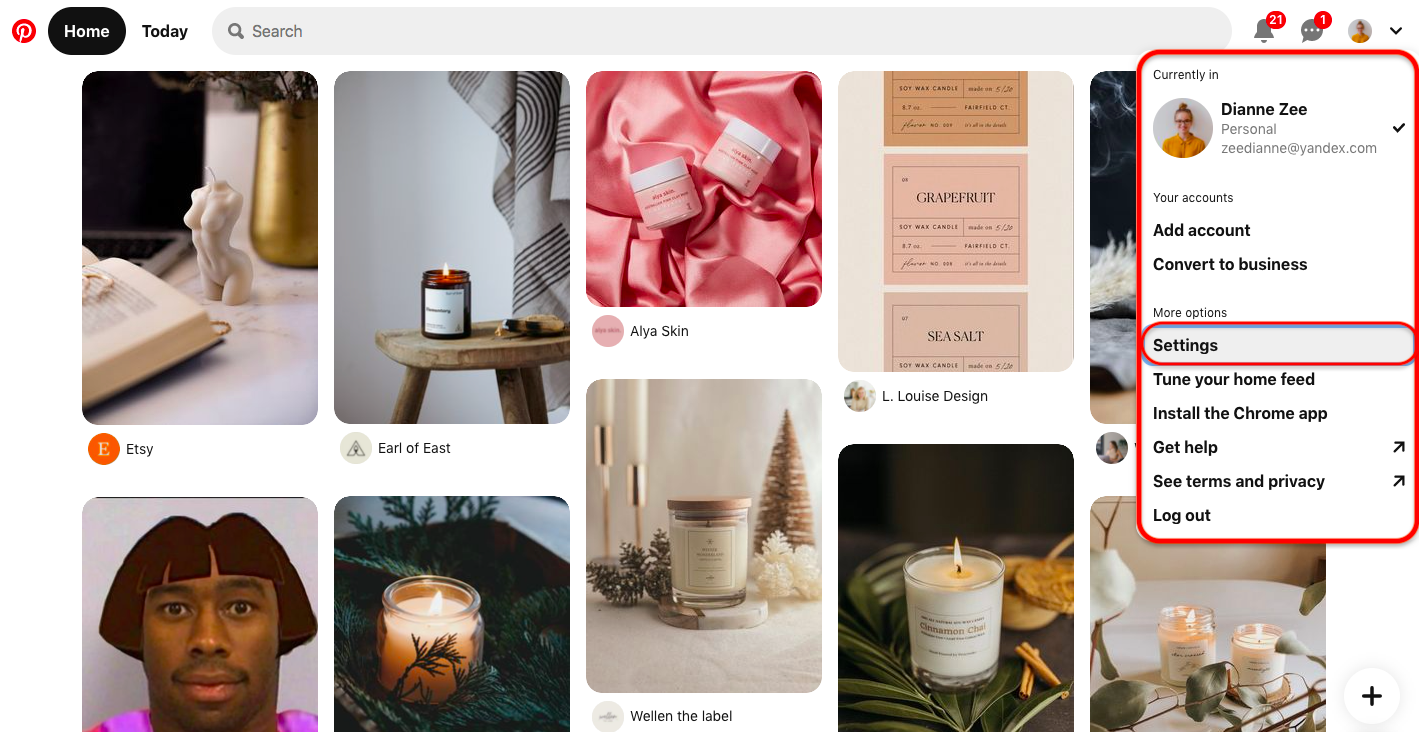
Step #2: Find and click on the down arrow symbol at the top-right of the dashboard.
Then, click on the "settings" to navigate to the other page.
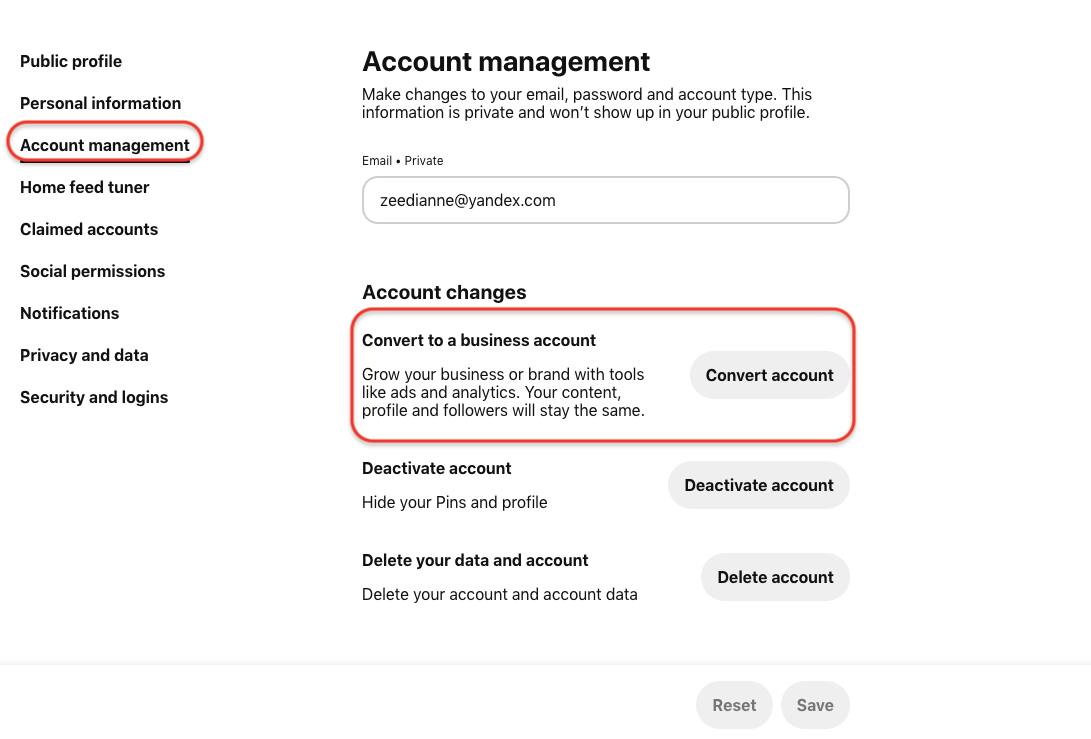
Step #3: Select "Account management" to make arrangements.
Here, you can see a section through which you can change your personal Pinterest account to have a business account.
Then, click on the "convert account" button under the Account changes section.
After having a business Pinterest account, you can create pins with this professional account.
Step #1: Log in to your free business account on Pinterest.
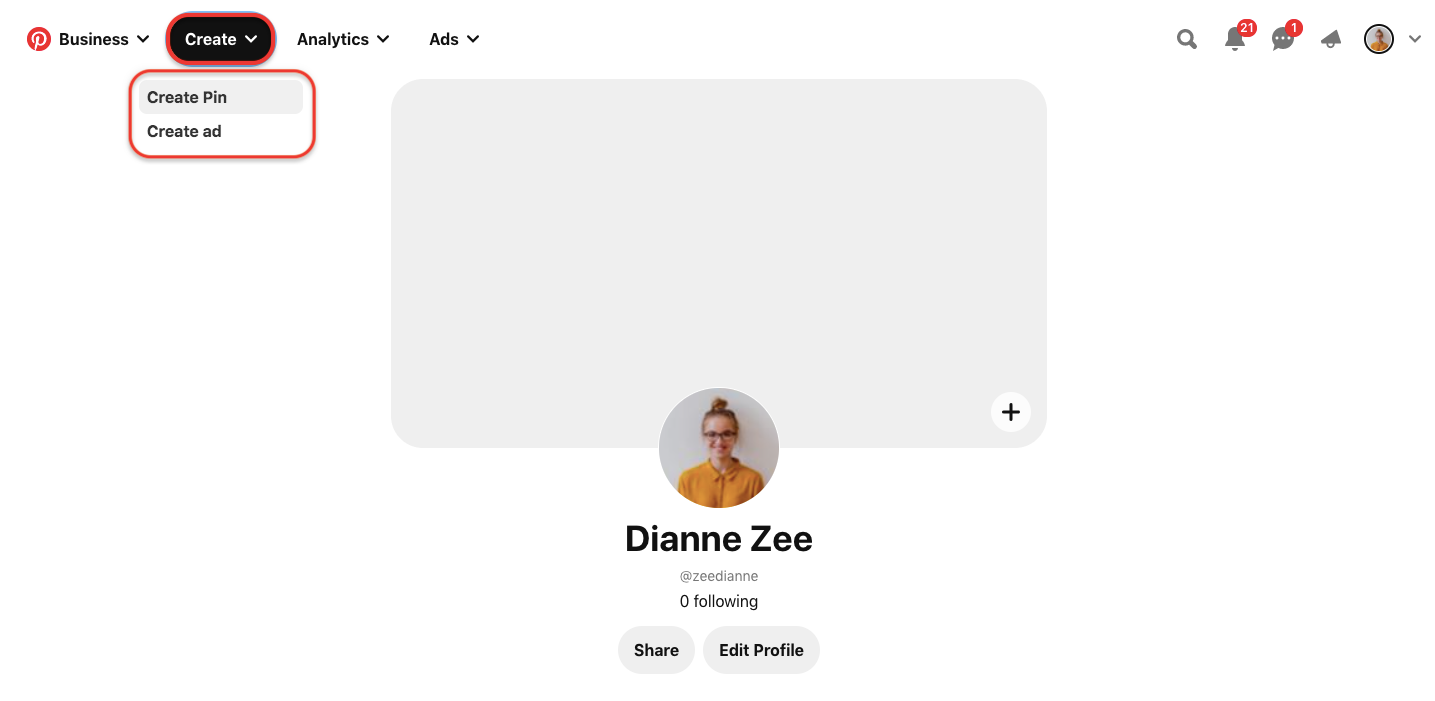
Navigate your profile page.
Step #2: Find the "create" button at the top-left of the page.
Click on the create. Then, select the "create pin".
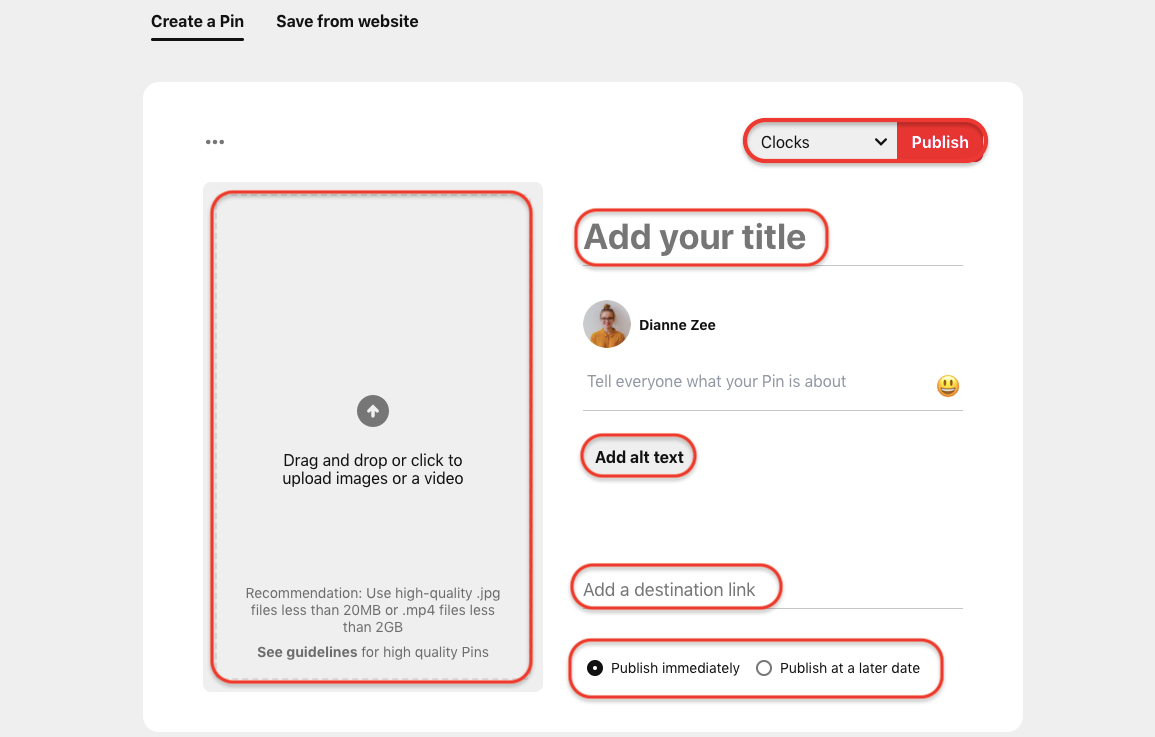
Step #3: You will navigate the pin creation section. There are parts you need to enter information.
Add a title, description, and destination link. It would be helpful to write an alternative text to be accessible to many people.
You can select images and videos from your desktop by clicking on the marked box or directly dropping it.
Select the most relevant Pinterest board that would fit your business account. If you have not created a useful one, you can create it by clicking on the down arrow symbol next to the publish button.
When you think everything is ready to be public as a pin, you can click on the "Publish".
One of the most beneficial features of having a Pinterest business account is having access to see your pins' analytics. As a business, it is significant to monitor how your pins perform. Pin stats allow your business to evaluate the relationship between the engagements and particular pins.

How to get the Pin stats?
Personal or professional, it is good to know if your pins can pull the attention of other people and the pinners. However, if you have a business account and want to use Pinterest more professionally, it becomes almost a need to track how your pins work on Pinterest. Indeed, looking at the social metrics and analytics is available only to the accounts having a business status.
When you generate a pin, the real-time metrics are estimated for that pin. It is the way you can interpret the way your pin performs.
Also, Pinterest does the calculation of Pin stats by using the data for all pins with an image and, if proper, an URL. As a result, the figures are derived from the audience who save the pins published by the business accounts. Saving pins by a save button/browser extension on your website, and your Pinterest board are counted for the data.
You can check your Pins' stats by following the steps below.
Step #1: Log in to your Pinterest business account.
Step #2: Navigate your business profile and click on "created" under your profile name.
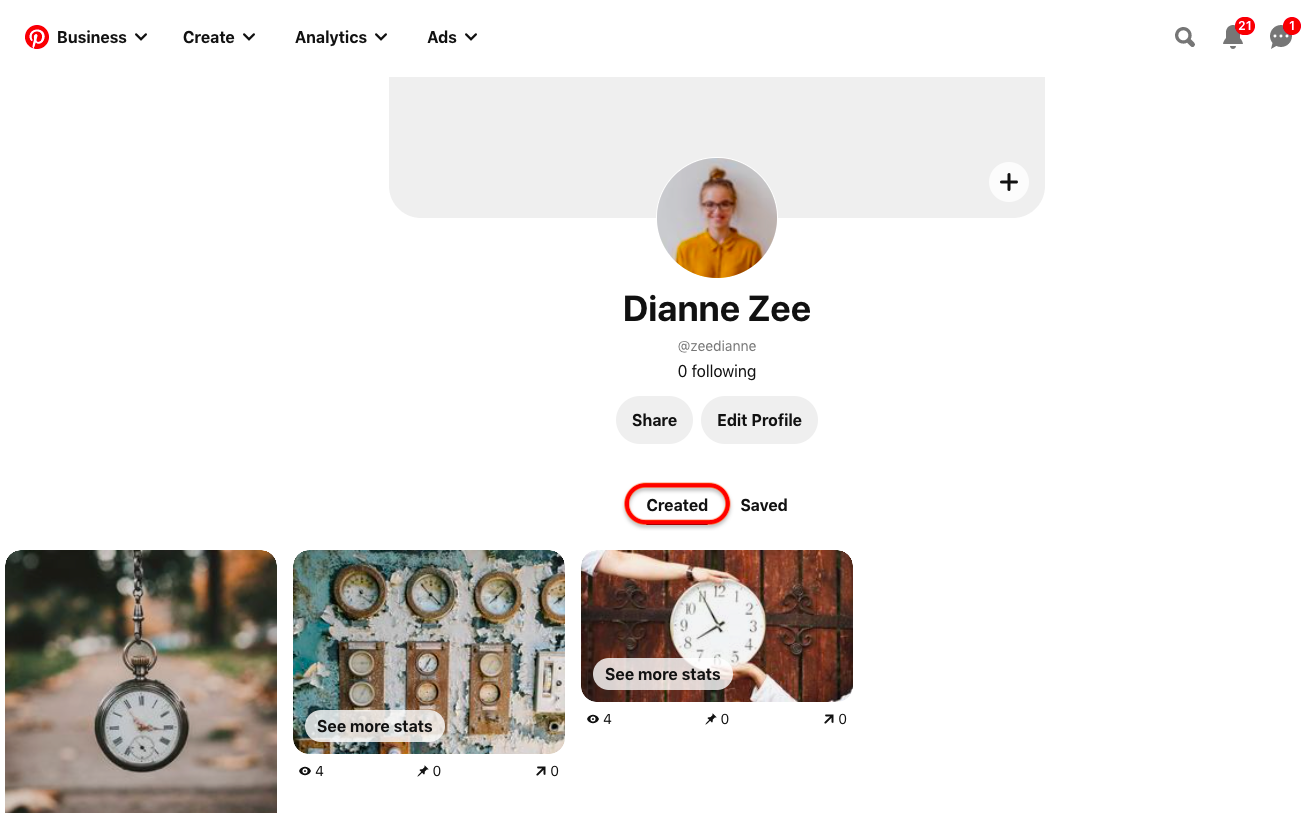
Step #3: Click on a pin you want to look at the metrics.
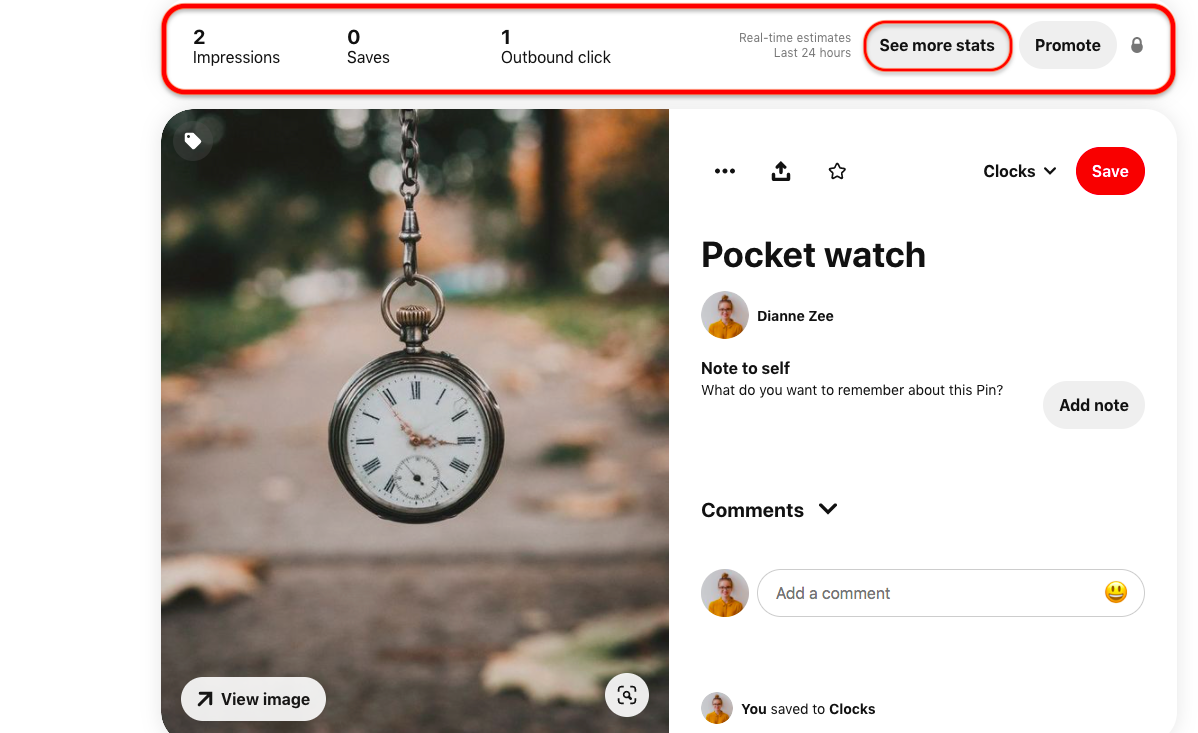
You can see the number of impressions, saves, and outbound clicks at the top of the pin you clicked. If you want to access further data, you can click on the "see more stats".
How to organize Pinterest boards?
There might be several topics and themes that you want to prepare Pinterest boards for them. It would be good for your personal or professional Pinterest accounts to have tidy profiles.
There are many reasons to have ordered Pinterest boards.
- It makes the management of your Pinterest account easier.
- The people or pinners can find your pins without difficulty
- The audience can smoothly search through your pins
- Your pins can get more shares
Mainly, if you have a business account and do not want to be lost in the management of Pinterest, having a profile with organized boards can ease your effort. Notedly, if you need to exist also in the other digital social channels for your business, it should be considered.
You can arrange your boards in automatic alphabetical order, according to the last time you save your pins, or by hand. You can make changes to the organization of your Pinterest boards in the following steps.
Step #1: Log into your Pinterest account.
Step #2: Navigate your profile by finding and clicking on the profile picture.
Step #3: Click on the "Saved" to look at your boards' page.
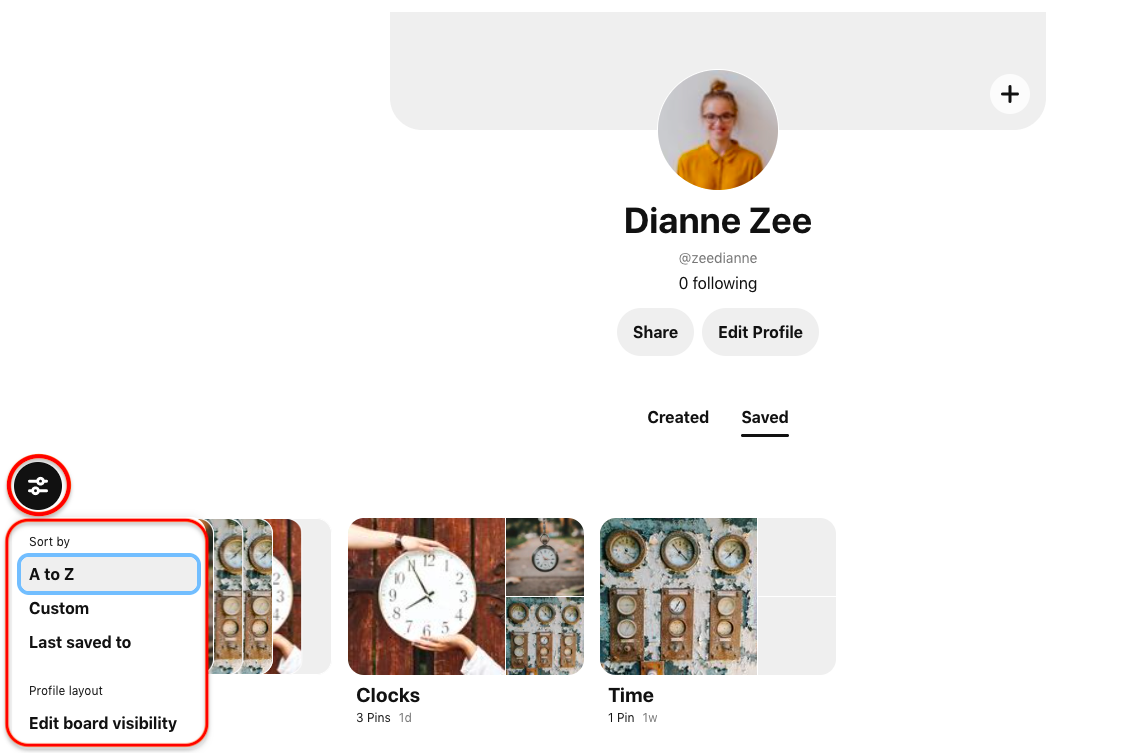
Step #4: Click on the marked area above your boards.
There are options available to arrange your boards as you wish. "A to Z" refers to the alphabetical order. If you select the "Custom", you can drag and drop manually. "The last saved to" is based on the order of the newest one.
If you need a more detailed arrangement for your Pinterest boards, you can try Pinterest sections.

How to make sections on Pinterest?
Sections are sub-boards on Pinterest. They function to create more comprehensive and detailed boards on your profile. The more the category of the boards is narrowed, the easier to find particular pins.
For instance, a board themed around food may not be enough to be efficient. To access what you or other pinners exactly want to find fast, you may want to separate categories of the recipes such as desserts, salads, Mexican cuisine, etc.
Some argue that using Pinterest sections is more beneficial for personal accounts than Pinterest business accounts. As a result of Pinterest sections, one more step occurs to click on the pin that links to your business' website. It delays or even cancels driving traffic towards the page you want the people to navigate. The other reason is the lack of a feature to add descriptions on the Pinterest sections.
Here, you can act through the steps below to generate applicable Pinterest sections.
Step #1: Log into your Pinterest account.
Step #2: Navigate your Pinterest profile by clicking on your profile picture at the tıo-right of the dashboard.
Step #3: Select the board you want to divide into various categories.
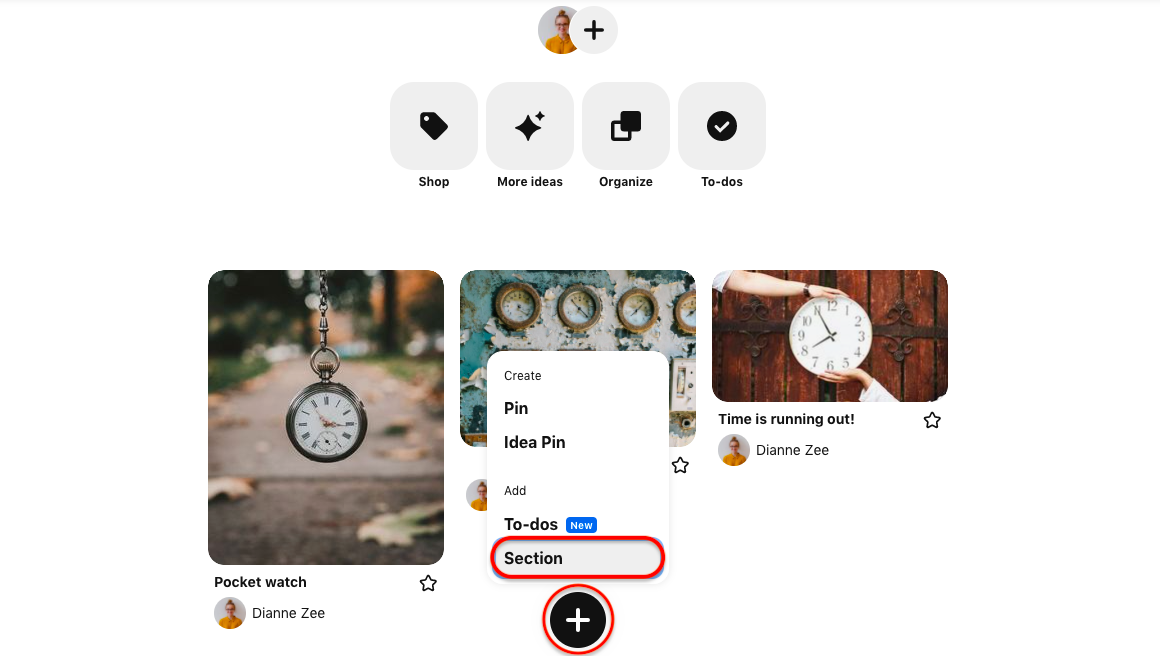
Step #4: Find the plus symbol (+) down the page and click on it.
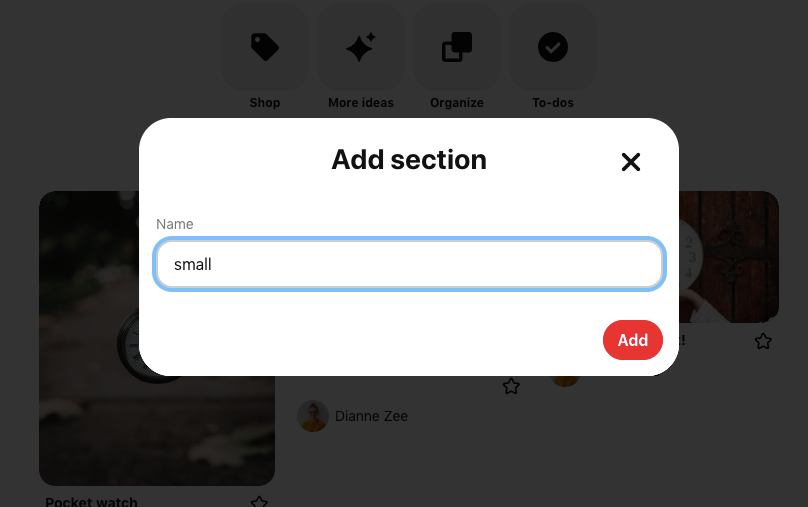
Step #5: Give a name for your sub-board/section. Then, click on add.
Step #6: After adding a section to your board, you can make more arrangements.
There are features under the mainboard. Click on the "organize" to distribute pins according to sub-categories.
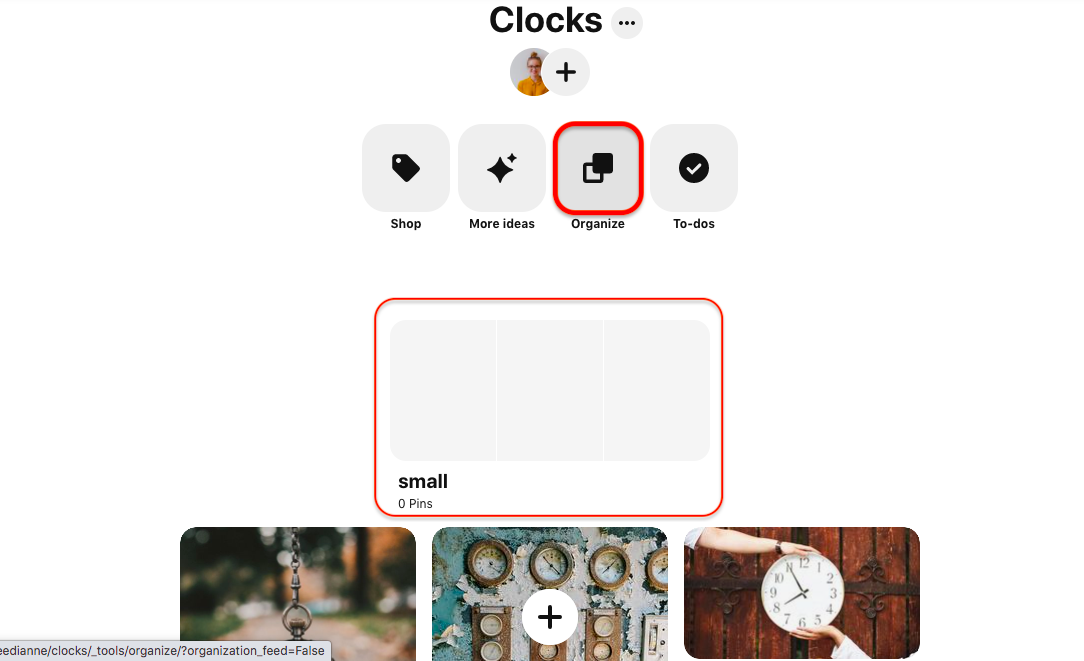
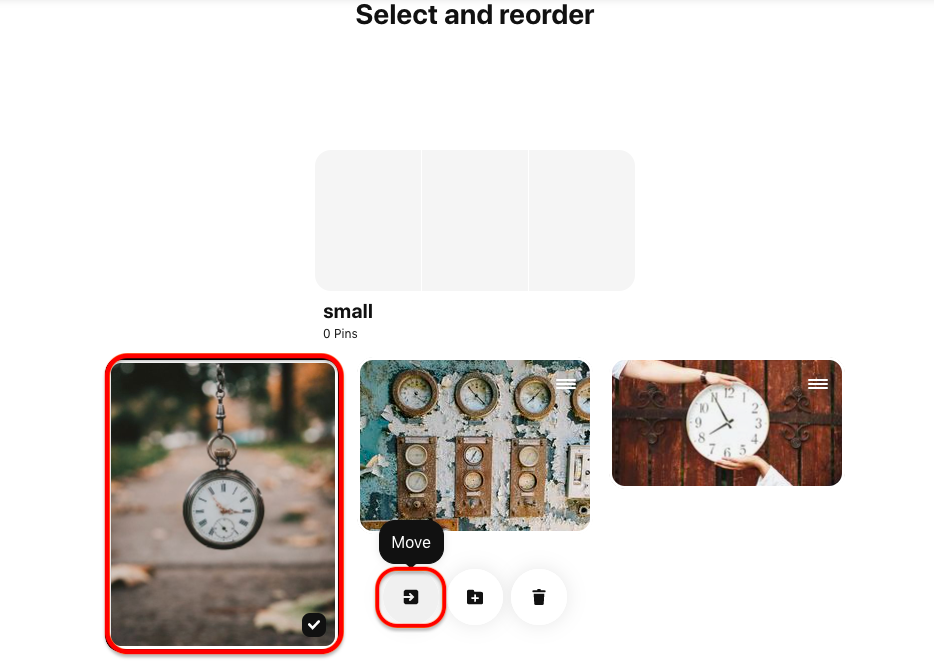
Step #7: Further part is to "select and reorder" pins.
First, choose a pin and click on it. Then, select the "move" button.
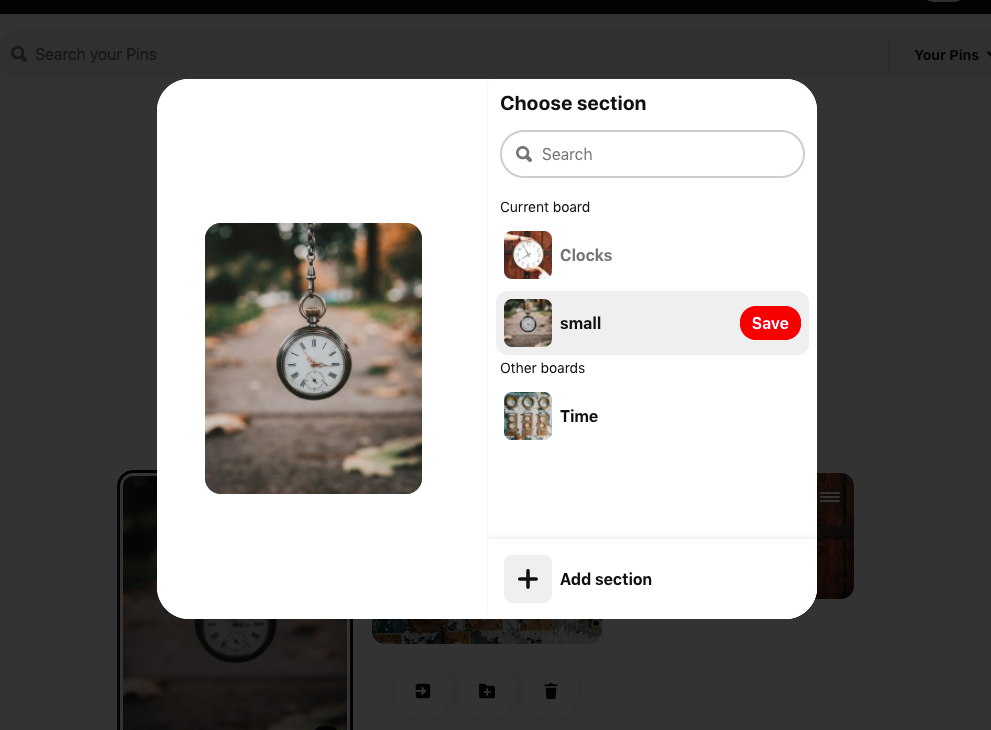
Step #8: You can select a section to locate a pin you want to see in a more specific grouping.
Click on the "save" button to finalize the process.
How to create a mood board on Pinterest?
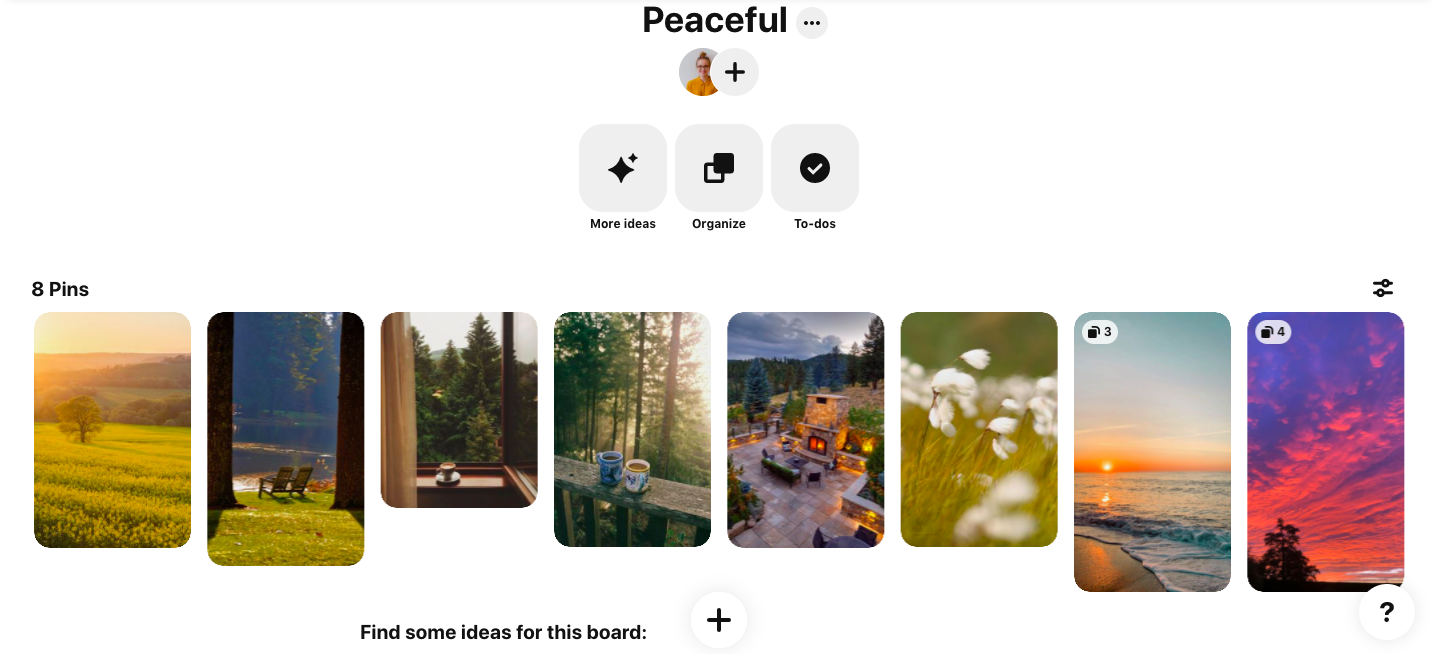
A mood board is the assembly of various items such as words, pictures, colors, designs, etc., in a single space. Mood boards are expected to deliver a particular mood for personal or professional reasons.
You can exhibit your ideas and feelings through these mood boards, which can be online or old-school.
Pinterest is one of the popular social platforms you can design your mood boards. To generate a mood board is a creative process. Therefore, there is no one way to make it.
Step #1: First of all, you need to think about which idea, emotion, or cause you to want to bring as your mood board on Pinterest. Then, log in to your Pinterest account.
Step #2: Navigate your profile by clicking on your profile picture. Then, click on the plus symbol (+) at the down-right of the page. Select creating a board and give a name to your mood board.
Step #3: Search relevant keywords on the browsing engine on Pinterest. Then, save the pins you feel favorable for your mood board.

Frequently asked questions
#1 Can I edit a pin's alternative text?
Yes, alternative texts on pins can be edited. After logging into your account, you can navigate your profile and click on a pin. Then, click on the three dots (...) and select "edit pin". You can find the "alt text" under the edit this pin section.
#2 Is it possible to add a pin to multiple boards?
Yes, you can save a Pinterest pin on different boards. It's also possible on Circleboom Publish's Pinterest Scheduler.
Sum up
Pinterest has become popular with its rich browsing engine and visual sharing place. If you want your business to grow through digital tools, do not miss the chances Pinterest offers.
You can quickly drive traffic to the website of your brand, organization, or blog. Visual content provides a fun place to spend more time on Pinterest, where your brand also has boards to present its campaign.
Therefore, it is crucial to learn how to use the features of Pinterest to create robust social media strategies and build attractive profiles. Via Circleboom Publish's Pinterest scheduling options, you can manage all your Pinterest pins and board through a single board!

