

As the burgeoning social network Bluesky continues its rapid expansion, a familiar challenge has emerged: the proliferation of impersonation accounts targeting public figures. This growing issue, previously highlighted by reports such as MIT Technology Review's coverage last year, underscores the critical need for robust account verification. While dedicated Bluesky enthusiasts have proactively developed their own informal verification methods to address this demand, the increasing influx of high-profile individuals – including recent additions like former President Barack Obama – amplifies the urgency for an official and standardized verification system. Such a system would not only provide crucial assurances to public figures regarding the authenticity of their presence on the platform but also foster a more secure and trustworthy environment for all Bluesky users.
Is it possible to remove followers on Bluesky? If you believe that you have many bot and fake followers, you might think of removing them from your profile. Let's discover the ways of removing Bluesky followers in our detailed guide ⬇️

As Bluesky's community lead, Jay Graber, aptly stated, the implementation of formal verification is a key step towards "reduc[ing] fraud and impersonation and driv[ing] a more trustworthy environment on Bluesky." For those looking to manage their presence effectively on this evolving platform, especially if considering the nuances of handling multiple profiles (a topic we explore further in our guide on managing multiple Bluesky accounts), understanding verification is crucial.

This article will guide you through the current methods and anticipated developments in verifying your Bluesky account, ensuring your authentic voice is clearly recognized.
How can I officially verify my Bluesky account?
Bluesky has introduced a new verification system with blue checkmarks. Here's a breakdown of how it currently works and you get the blue check:
Key Points:
- No Direct Applications (Currently): Bluesky is not currently accepting direct applications for verification from individual users.
- Proactive Verification: Bluesky is proactively verifying accounts that they deem authentic and notable. These accounts will receive a standard blue checkmark.
- Trusted Verifiers: Bluesky has introduced "Trusted Verifiers" - select independent organizations that can directly verify accounts. These verified accounts will have a scalloped blue checkmark, and tapping on the check will show which organization verified them (e.g., The New York Times verifying their journalists).
- Self-Verification via Domain: You can still self-verify your account by setting your own domain name as your username. This involves adding a TXT record to your domain's DNS settings.
Step-by-Step Guide (Current Options):
1. Self-Verification via Your Own Domain (Still Available):
This method proves you own a specific website or domain.
- Step 1: Create a Bluesky Account: If you haven't already, sign up for a Bluesky account. You can choose any placeholder username initially.
- Step 2: Access Account Settings: Open the Bluesky app and navigate to your profile menu (usually a three-line icon or your avatar). Go to "Settings," then "Account," and then "Handle."
- Step 3: Choose "I have my own domain": On the "Change my handle" screen, select this option.

- Step 4: Obtain the DID Value: Bluesky will provide you with a specific "DID" value (a decentralized identifier) and the DNS record information you need to add to your domain.
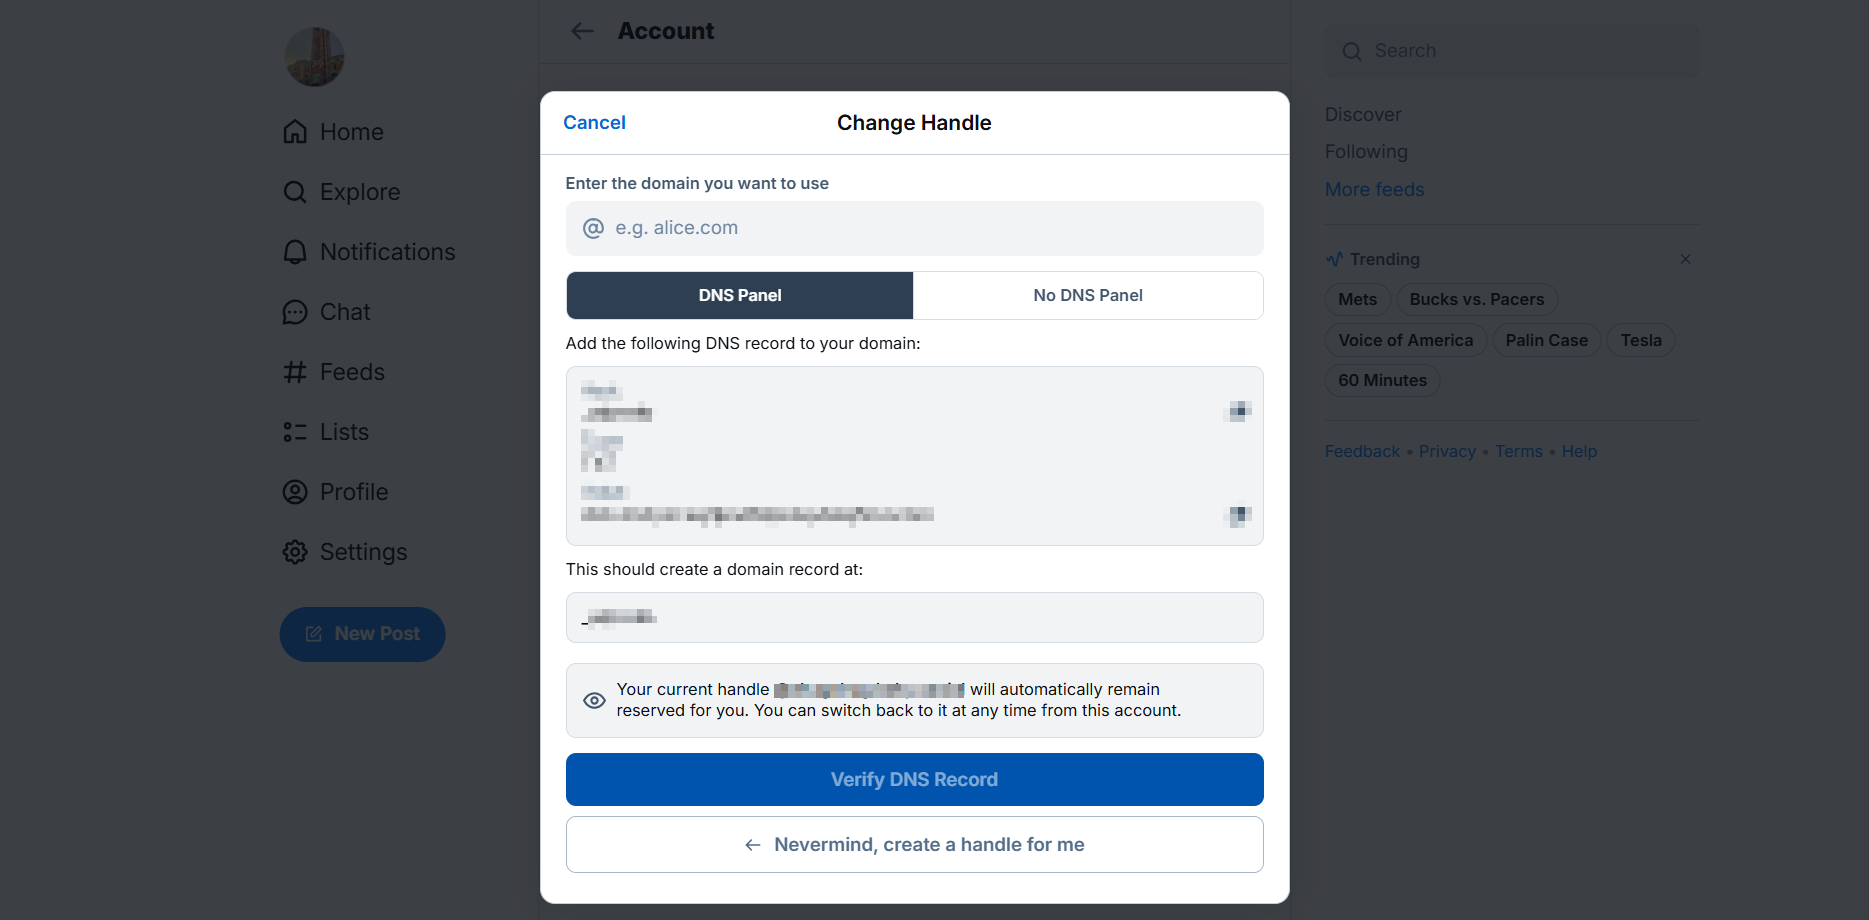
- Step 5: Access Your Domain Registrar/DNS Management: Go to the website of the company where you registered your domain (e.g., Namecheap, GoDaddy, Google Domains). Find the DNS management settings for your domain. This might be under an "Advanced DNS" tab.
- Step 6: Add a TXT Record:
- Host/Name: Enter
_atproto - Type: Select
TXT - Value/Data: Enter the DID value provided by Bluesky in the format:
did=did:plc:[your value here]
- Host/Name: Enter
- Step 7: Verify DNS Record: After adding the TXT record, go back to the Bluesky app and click "Verify DNS Record." Allow a few minutes for the DNS changes to propagate.
- Step 8: Check Your Profile: Once verified, your Bluesky handle will change to your domain name (e.g.,
@yourdomain.com), and this acts as a form of self-verification.
2. Awaiting Proactive Verification or Future Application Process:
- Step 1: Maintain an Authentic and Notable Account: Focus on creating genuine, engaging content and building a reputable presence on Bluesky.
- Step 2: Monitor Bluesky Announcements: Keep an eye on the official Bluesky account (
@bsky.app) for announcements regarding the rollout of the new blue check system and any future application process. - Step 3: Be Patient: As the feature stabilizes, Bluesky has stated they will eventually launch a request form for notable and authentic accounts interested in getting verified.
Summary
Currently, the primary way to get a form of official verification on Bluesky is by self-verifying through your own domain. The new blue check system is being rolled out proactively to notable accounts, and a public application process is expected in the future.


