A strong presence on social media platforms like LinkedIn is crucial for professionals and businesses. LinkedIn, the world's largest professional network, provides a unique platform to showcase expertise, connect with industry peers, and build a professional brand.
One powerful way to leverage LinkedIn is by sharing insightful articles. But with busy schedules, consistently posting can be a challenge. This is where scheduling posts and links to your articles on LinkedIn comes in handy.
Why is LinkedIn important?
LinkedIn is more than just a networking site; it's a powerful tool for career development and business growth. Here are a few reasons why LinkedIn is essential:
- Professional Networking: LinkedIn connects you with professionals across various industries, opening up opportunities for collaboration, mentorship, and career advancement.
- Personal Branding: Regularly sharing articles and updates helps you establish yourself as an expert in your field, enhancing your professional reputation.
- Business Growth: For businesses, LinkedIn is an effective platform for lead generation, brand awareness, and customer engagement.
- Job Opportunities: Many companies use LinkedIn for recruiting, making it a vital platform for job seekers to showcase their skills and experience.
How to schedule articles on LinkedIn
Scheduling articles allows you to maintain a consistent posting schedule without being online all the time. Here’s a step-by-step guide on how to schedule articles on LinkedIn:
How To Schedule Articles on LinkedIn On Desktop
Click Start an article at the top of your LinkedIn homepage.
The Create a post pop-up window appears. Type the content of your post in the What do you want to talk about? field.

In the Schedule post-pop-up window, select a date and time when you want to publish the post.


Click Next.


- To change the time of the post before scheduling it, click the Clock icon, update the time, click Next, and then click Schedule to schedule the post.
- If you don’t want to schedule a post, click Edit next to the time mentioned above the post. In the Schedule post pop-up window, click Clear time. The schedule details are no longer available.
- Once a post is scheduled, you can reschedule the publish time or delete the post.
To View Scheduled Posts
Click Start a post at the top of your LinkedIn homepage.
Click the Clock icon on the lower-left of the Create a Post pop-up window.
In the Schedule post-pop-up window, click View all scheduled posts in the lower-left corner.

- To preview a schedule post, click the post, and view the details.
- To delete a scheduled post, click the Delete icon next to the post. In the Delete scheduled post? a pop-up window, click Delete, and confirm your action.
Note: Currently, scheduling posts is not supported for the following types of posts:
- Events
- Jobs
- Services
If you add any of the above types to your post, you will see an error message indicating that scheduling is not supported for that post. Either clear the selected date/time to post immediately or remove the invalid post type.
How To Schedule Posts on LinkedIn On Mobile
Tap Post in the navigation bar. The Share Post pop-up window appears.
Type the content of your post in the What do you want to talk about?
Tap the Clock icon in the upper-right corner.
- In the Schedule pop-up window, select a date and time when you want to publish the post. The time selected must be within 1 hour to 3 months from the current time (rounded to the nearest interval).
- You can also enter the exact time to schedule a post instead of using the 30-minute increment options from the dropdown.
- Note that the scheduled time will be standardized in UTC relative to your current location.
Tap Next. You can see the scheduled date and time above the post.
Tap Schedule in the upper-right corner. A post-scheduled confirmation pop-up appears.
- If you don’t want to schedule a post, tap Edit next to the time mentioned above the post. In the Schedule pop-up window, tap Clear. The schedule details are no longer available. Tap Post to create your post immediately or tap the Close icon on the upper-left corner to discard the post.
- Once a post is scheduled, you can reschedule the publish time or delete the post.
To View Scheduled Posts
Tap Post in the navigation bar. The Share Post pop-up window appears.
Tap the Clock icon.
In the Schedule pop-up window, tap View All. You can view a preview of all the posts that you’ve scheduled in the Scheduled Posts screen.
- To preview a scheduled post, tap the post and view the details.
- To delete a scheduled post, tap the Delete icon next to the post. In the Delete scheduled post? a pop-up window, tap Delete, and confirm your action.
Choose a Scheduling Tool
You’ll need a social media management tool to schedule links to your articles on LinkedIn. One of the best tools for this purpose is Circleboom Publish. Circleboom Publish enables you to schedule posts across multiple platforms, including LinkedIn, Twitter, and Facebook.
1. Connect Your LinkedIn Account
After signing up for Circleboom Publish, connect your LinkedIn account to the platform. This will allow the tool to post on your behalf.
2. Create Your Article
Write your article or paste it from your document editor. Ensure your article is engaging, informative, and relevant to your audience.
3. Schedule Your Post
Once your post is ready, get the link and choose the date and time you want it to be published. Circleboom Publish offers a user-friendly interface to select your preferred posting schedule.
4. Add Images and Hashtags
Enhance your posts with relevant images and hashtags. This can help increase visibility and engagement. Circleboom also integrates with tools like Canva, making it easy to design eye-catching visuals for your posts.
6. Review and Confirm
Before finalizing, review your scheduled post to ensure everything is in order. Once confirmed, Circleboom will handle the rest, posting your content at the scheduled time.
Benefits of Scheduling Links to the Articles
Scheduling links to your articles on LinkedIn offers several advantages:
- Consistency: Maintain a regular posting schedule, which is key to building a loyal audience.
- Time Management: Plan and create your content in advance, allowing time for other important tasks. Consider leveraging auto time tracking to automatically track your time spent on different tasks and projects, helping you to improve your productivity and efficiency.
- Maximized Reach: Post at optimal times when your audience is most active, increasing the chances of engagement.
- Reduced Stress: Eliminate the pressure of posting in real-time, allowing you to focus on content quality.
How do you use Circleboom Publish's LinkedIn scheduling tool?
Circleboom Publish has many great tools to help you manage your social media accounts. But for now, let's focus on Circleboom Publish's LinkedIn post-scheduling tool. Here, we have prepared a step-by-step guide on how to use Circleboom Publish's LinkedIn Scheduling Tool.
Step #1: Log in to Circleboom Publish.
Signing up only takes a few seconds if you don't have a Circleboom Publish account.
Step 2: On the dashboard, you will see options for Twitter, Facebook, LinkedIn, Google My Business, Instagram, YouTube and Pinterest.
Select the "LinkedIn Profile" option to manage your LinkedIn account, or click "LinkedIn Page" to manage your LinkedIn Company Page.
Step #3: Finalize the authorization process to link your LinkedIn account to Circleboom Publish's innovative dashboard.
The process to link your account will only take a few seconds.
Step #4: After completing the process, open the left-hand menu and find the "Create New Post" option.
Click it to open Circleboom Publish's LinkedIn Scheduling Tool.
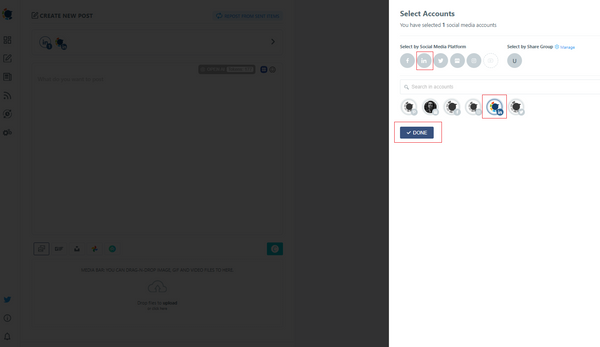
Step 5: On the post creation dashboard, first select the LinkedIn account or Page for which you want to schedule posts.
If you want to use Circleboom Publish's LinkedIn Scheduling Tool for multiple accounts, you can select them here, too!
Once you tap the select account box, you will be presented with a couple of options. If you want to use the LinkedIn post scheduling tool for all LinkedIn accounts, you can use the option "select by the social media platform."
You can also use the option "Select by Group" to sub-group the social media accounts that you regularly post together.
Step #6: Now, you can start creating your post on the left and check its preview on the right hand simultaneously.
After your post is ready to go, locate the "Add to my Queue," "Schedule it," and "Post" options under the post preview.
Pro Tip: Circleboom Publish offers users a built-in version of the ultimate design tool, Canva! Using Canva on Circleboom Publish, you can enhance your posts with eye-catching visuals, graphics, and templates.
So, you don't need to open millions of tabs while creating, editing, and publishing your content. You can complete all the necessary steps on the intelligent dashboard of Circleboom Publish.
Step #7: Click "Schedule it" right below the post preview to schedule your LinkedIn post for a future date.
Don't forget to check the preview of your content to avoid any mistakes.
Step #8: A new box will open once you click the "Schedule it" button. Here, select the desired date and time to schedule your post.
Then, click "Schedule it" to complete the last step of Circleboom Publish's LinkedIn post-scheduling tool guide.
Final Thoughts
LinkedIn is an invaluable platform for professionals and businesses looking to grow their online presence. By scheduling links to your articles without the hassle of manual posting, you can ensure a consistent and effective content strategy. With tools like Circleboom Publish, managing your LinkedIn posts becomes seamless, allowing you to focus on creating high-quality content that resonates with your audience.
So, take advantage of scheduling tools and start sharing your insights on LinkedIn today. Not only will you enhance your professional reputation, but you’ll also engage and grow your network more efficiently.


